Automate Azure IAM for AKS
Otterize automates Azure IAM identities and role assignments for your Azure AKS workloads, all in Kubernetes.
In this tutorial, we will:
- Optionally, spin up an AKS cluster, install the Otterize Kubernetes operator on it, and configure it to manage Azure IAM.
- Deploy a client pod that downloads file from one blob container, and upload them to another.
- Label the client pod, telling the credentials operator to link its Kubernetes ServiceAccount with an Azure workload identity created for it.
- See attempted operation to Azure Blob Storage.
- Create a
ClientIntentsresource allowing the client pod to access Azure Blob Storage, that tells the intents operator to create a role assignment and associate it with the previously created workload identity. - See that the client is now able to list files in the Azure Blob Storage container.
Prerequisites
Already have Otterize deployed with the Azure IAM integration configured on your cluster? Skip to the tutorial.
1. Install the Azure CLI
Follow the installation instructions for the Azure CLI.
2. Create an Azure AKS cluster
Before you start, you'll need an Azure AKS cluster, with OIDC issuer & workload identity enabled.
How to set up an Azure AKS cluster using the Azure CLI
Export the following environment variables:
export LOCATION="eastus"
export RESOURCE_GROUP="otterizeAzureIAMTutorialResourceGroup"
export AKS_CLUSTER_NAME="otterizeAzureIAMTutorialAKSCluster"
Create a resource group:
az group create --name $RESOURCE_GROUP --location $LOCATION
Create an AKS cluster, with OIDC issuer and workload identity enabled:
az aks create -g $RESOURCE_GROUP -n $AKS_CLUSTER_NAME --node-count 1 --enable-oidc-issuer --enable-workload-identity --generate-ssh-keys
Alternatively, update an existing AKS cluster to enable OIDC issuer and workload identity:
How to update an existing AKS cluster using the Azure CLI
Export the following environment variables:
export LOCATION="<YOUR_LOCATION>"
export RESOURCE_GROUP="<YOUR_RESOURCE_GROUP>"
export AKS_CLUSTER_NAME="<YOUR_AKS_CLUSTER_NAME>"
Update the AKS cluster to enable OIDC issuer and workload identity:
az aks update -g $RESOURCE_GROUP -n $AKS_CLUSTER_NAME --enable-oidc-issuer --enable-workload-identity
Don't forget to configure your kubeconfig for your cluster. If using the example cluster above, use this command:
az aks get-credentials -n $AKS_CLUSTER_NAME -g $RESOURCE_GROUP
2. Deploy Otterize for Azure IAM
To deploy Otterize, head over to Otterize Cloud and:
- Create a Kubernetes integration on the Integrations page, and follow the instructions. Make sure to enable enforcement mode for this tutorial. If you already have a Kubernetes cluster connected, skip this step.
- You will first need to install Otterize in your cluster. If your cluster is not already connected, you can do so by following the Kubernetes setup instructions detailed on the Integrations page.
When installing Otterize, append the following flag to the Helm command to enable the eBPF agent, which is responsible for inspecting SSL and non-SSL traffic and generates the visibility into Azure traffic:
helm upgrade ... --set networkMapper.nodeagent.enable=true
- Create an Azure IAM integration on the Integrations page.
- Input your Azure tenant & subscription IDs. These are available in the Azure portal, or by running the following command:
az account list --output table - If you are using the cluster from the previous step, the resource group name is
otterizeAzureIAMTutorialResourceGroupand the cluster name isotterizeAzureIAMTutorialAKSCluster.
- Input your Azure tenant & subscription IDs. These are available in the Azure portal, or by running the following command:
Once the Azure integration is configured, you'll be presented with instructions for configuring your Otterize integration with Azure IAM support. This creates a managed identity and federated identity credential for the Otterize Kubernetes operator, and assigns it the resource group owner role on the resource group containing your AKS cluster, so that it is able to manage identitiies and role assignments for your AKS workloads. This setup is required once per-cluster.
After Terraform has configured your cluster, click Next and you'll be presented with the configuration for deploying Otterize. Since you now have the Azure integration enabled, you need to redeploy Otterize with Azure integration enabled flag, providing it the client ID for the managed identity created during the terraform installation.
Tutorial
Create an Azure Blob Storage account & container
Create a general-purpose storage account using the Azure CLI:
export STORAGE_ACCOUNT_NAME=ottrtutorial`date +%s`
az storage account create \
  --name $STORAGE_ACCOUNT_NAME \
  --resource-group $RESOURCE_GROUP
Create an uploads container in the storage account:
az storage container create \
    --account-name $STORAGE_ACCOUNT_NAME \
    --name uploads
Create a downloads container in the storage account:
az storage container create \
    --account-name $STORAGE_ACCOUNT_NAME \
    --name downloads
Upload a blob to the downloads container:
echo "Hello, Azure integration" > hello.txt
az storage blob upload \
    --account-name $STORAGE_ACCOUNT_NAME \
    --container-name downloads \
    --file hello.txt \
    --name hello.txt
Deploy the sample client
kubectl apply -f https://docs.otterize.com/code-examples/azure-iam-aks/client.yaml
kubectl patch -n otterize-tutorial-azure-iam deployment/client --type='json' -p="[{\"op\": \"replace\", \"path\": \"/spec/template/spec/containers/0/env\", \"value\": [{\"name\": \"STORAGE_ACCOUNT_NAME\", \"value\": \"$STORAGE_ACCOUNT_NAME\"}]}]"
Expand to see the deployment YAML
apiVersion: v1
kind: Namespace
metadata:
  name: otterize-tutorial-azure-iam
---
apiVersion: v1
kind: ServiceAccount
metadata:
  name: client
  namespace: otterize-tutorial-azure-iam
---
apiVersion: apps/v1
kind: Deployment
metadata:
  name: client
  namespace: otterize-tutorial-azure-iam
spec:
  selector:
    matchLabels:
      app: client
  template:
    metadata:
      labels:
        app: client
        # Required by the Azure workload identity operator, only the pods with this label can use workload identity
        azure.workload.identity/use: "true"
    spec:
      serviceAccountName: client
      containers:
        - name: client
          image: mcr.microsoft.com/azure-cli
          command: [ "/bin/sh", "-c", "--" ]
          env:
            - name: STORAGE_ACCOUNT_NAME
              value: ottrazuredemo
          args:
            - while true;
              do
                echo;
                echo 'Client - The time is:' $(date);
                echo;
                if [[ -z "$AZURE_CLIENT_ID" ]]; then echo "Azure client ID not set";
                else
                  echo 'Logging in using federated identity credentials';
                  az login -o table --federated-token $(cat $AZURE_FEDERATED_TOKEN_FILE) --service-principal -u $AZURE_CLIENT_ID -t $AZURE_TENANT_ID;
                  echo;
                  echo 'Downloading file from storage blob container downloads in storage account' $STORAGE_ACCOUNT_NAME;
                  az storage blob download --account-name $STORAGE_ACCOUNT_NAME -c downloads -n hello.txt --auth-mode login -o table;
                  echo 'Uploading file to storage blob container uploads in storage account' $STORAGE_ACCOUNT_NAME;
                  az storage blob upload --account-name $STORAGE_ACCOUNT_NAME --container-name uploads -n hello.txt --data "hello"  --overwrite --auth-mode login -o table;
                  echo;
                fi;
                sleep 5;
              done
View logs for the client - Azure client ID not set
The client logs will show that the Azure client ID environment variable is not set. This is because no Azure workload identity has been created for the client pod yet.
kubectl logs -f -n otterize-tutorial-azure-iam deploy/client
Client - The time is: Sun Mar 10 18:40:37 UTC 2024

Azure client ID not set
Label the client pod to create an Azure workload identity
Label the client pod so that the Otterize credentials operator creates an Azure workload identity for it and binds its Kubernetes ServiceAccount to the newly created identity:
kubectl patch -n otterize-tutorial-azure-iam deployment/client -p '{"spec": {"template":{"metadata":{"labels":{"credentials-operator.otterize.com/create-azure-workload-identity":"true"}}}} }'
This applies the following label to the client pod:
metadata:
  labels:
    credentials-operator.otterize.com/create-azure-workload-identity: "true"
An Azure workload identity was created for the client pod
Let's inspect the created managed identity
az identity list --query "[?starts_with(name,'ottr-uai-')]" --resource-group $RESOURCE_GROUP --output table
In the output, you should see that a managed identity was created for the client workload, with the name starting with ottr-uai-otterize-tutorial-azure-iam-client-...:
Name                                                                                  Location    TenantId                              PrincipalId                           ClientId                              ResourceGroup
------------------------------------------------------------------------------------  ----------  ------------------------------------  ------------------------------------  ------------------------------------  ---------------------------------
ottr-uai-otterize-tutorial-azure-iam-client-otterizeAzureIAMTutorialAKSCluster-XXXXX  eastus      00000000-0000-0000-0000-000000000000  00000000-0000-0000-0000-000000000000  00000000-0000-0000-0000-000000000000  otterizeAzureIAMTutorialResourceGroup
You could also inspect the federated identity credential created for the client workload:
export WORKLOAD_IDENTITY_NAME=$(az identity list --query "[?starts_with(name,'ottr-uai-otterize-tutorial-azure-iam-client-$AKS_CLUSTER_NAME')].name" --resource-group $RESOURCE_GROUP  -o tsv)
az identity federated-credential list --identity-name $WORKLOAD_IDENTITY_NAME --resource-group $RESOURCE_GROUP --output table --query "[].{name:name, subject:subject}"
In the output, you should see that a federated identity credential was created for the client workload:
Name                                                                                  Subject
------------------------------------------------------------------------------------  --------------------------------------------------------
ottr-fic-otterize-tutorial-azure-iam-client-otterizeAzureIAMTutorialAKSCluster-XXXXX  system:serviceaccount:otterize-tutorial-azure-iam:client
The Kubernetes ServiceAccount was annotated with the workload identity ID
The credentials operator automatically annotated the Kubernetes ServiceAccount for the client pod with the newly created workload identity
Let's look at the service account:
kubectl get serviceaccount -n otterize-tutorial-azure-iam client -o yaml
apiVersion: v1
kind: ServiceAccount
metadata:
  annotations:
    azure.workload.identity/client-id: 6fda2902-d98c-40f6-800d-29d5856e359a
  name: client
  namespace: otterize-tutorial-azure-iam
View logs for the client - Azure client ID is set, but no subscriptions found
The client logs will now show that the Azure client ID environment variable is set, and the client attempts to log in using federated identity credentials. However, the client is still unable to login or access any Azure resources, as no Azure IAM role assignments have been created for the client workload identity yet.
kubectl logs -f -n otterize-tutorial-azure-iam deploy/client
Logging in using federated identity credentials
ERROR: No subscriptions found for 00000000-0000-0000-0000-000000000000

Listing storage blob container ottrtutorialcontainer in storage account ottrtutorial
ERROR: Please run 'az login' to setup account.
Apply intents to create the necessary IAM role assignments
By annotating the pod, we've created a workload identity. We now need to specify what we need to access, and the intents operator will create an Azure IAM role assignment accordingly.
To do so, we will apply a ClientIntents resource that permits the client pod to download files from the source container:
kubectl apply -n otterize-tutorial-azure-iam -f https://docs.otterize.com/code-examples/azure-iam-aks/clientintents-1.yaml
kubectl patch -n otterize-tutorial-azure-iam clientintents/client-intents-for-client  --type='json' -p="[{\"op\": \"replace\", \"path\": \"/spec/calls/0/name\", \"value\": \"/providers/Microsoft.Storage/storageAccounts/$STORAGE_ACCOUNT_NAME/blobServices/default/containers/downloads\"}]"
This applies the following ClientIntents, granting read access to the downloads container in the storage account:
apiVersion: k8s.otterize.com/v2beta1
kind: ClientIntents
metadata:
  name: client-intents-for-client
  namespace: otterize-tutorial-azure-iam
spec:
  workload:
    name: client
    kind: Deployment
  targets:
    - azure:
        scope: /providers/Microsoft.Storage/storageAccounts/STORAGE_ACCOUNT_NAME/blobServices/default/containers/downloads
        dataActions:
          - Microsoft.Storage/storageAccounts/blobServices/containers/blobs/read
The client can now download files from the Azure Blob Storage container!
Let's look at the client logs again:
kubectl logs -f -n otterize-tutorial-azure-iam deploy/client
Client - The time is: Sun Mar 10 18:53:24 UTC 2024

Logging in using federated identity credentials
CloudName    HomeTenantId                          IsDefault    Name                  State    TenantId
-----------  ------------------------------------  -----------  --------------------  -------  ------------------------------------
AzureCloud   00000000-0000-0000-0000-000000000000  True         Azure subscription 1  Enabled  00000000-0000-0000-0000-000000000000

Downloading file from storage blob container downloads in storage account ottrtutorial1735147968
 Hello, Azure integration                                                                                                                        │
Alive[################################################################]  100.0000%Finished[#################################################### │
Uploading file to storage blob container uploads in storage account ottrtutorial1735147968                                                      │
ERROR:                                                                                                                                          │
You do not have the required permissions needed to perform this operation.                                                                      │
Depending on your operation, you may need to be assigned one of the following roles:                                                            │
    "Storage Blob Data Owner"                                                                                                                   │
    "Storage Blob Data Contributor"                                                                                                             │
    "Storage Blob Data Reader"                                                                                                                  │
    "Storage Queue Data Contributor"                                                                                                            │
    "Storage Queue Data Reader"                                                                                                                 │
    "Storage Table Data Contributor"                                                                                                            │
    "Storage Table Data Reader"
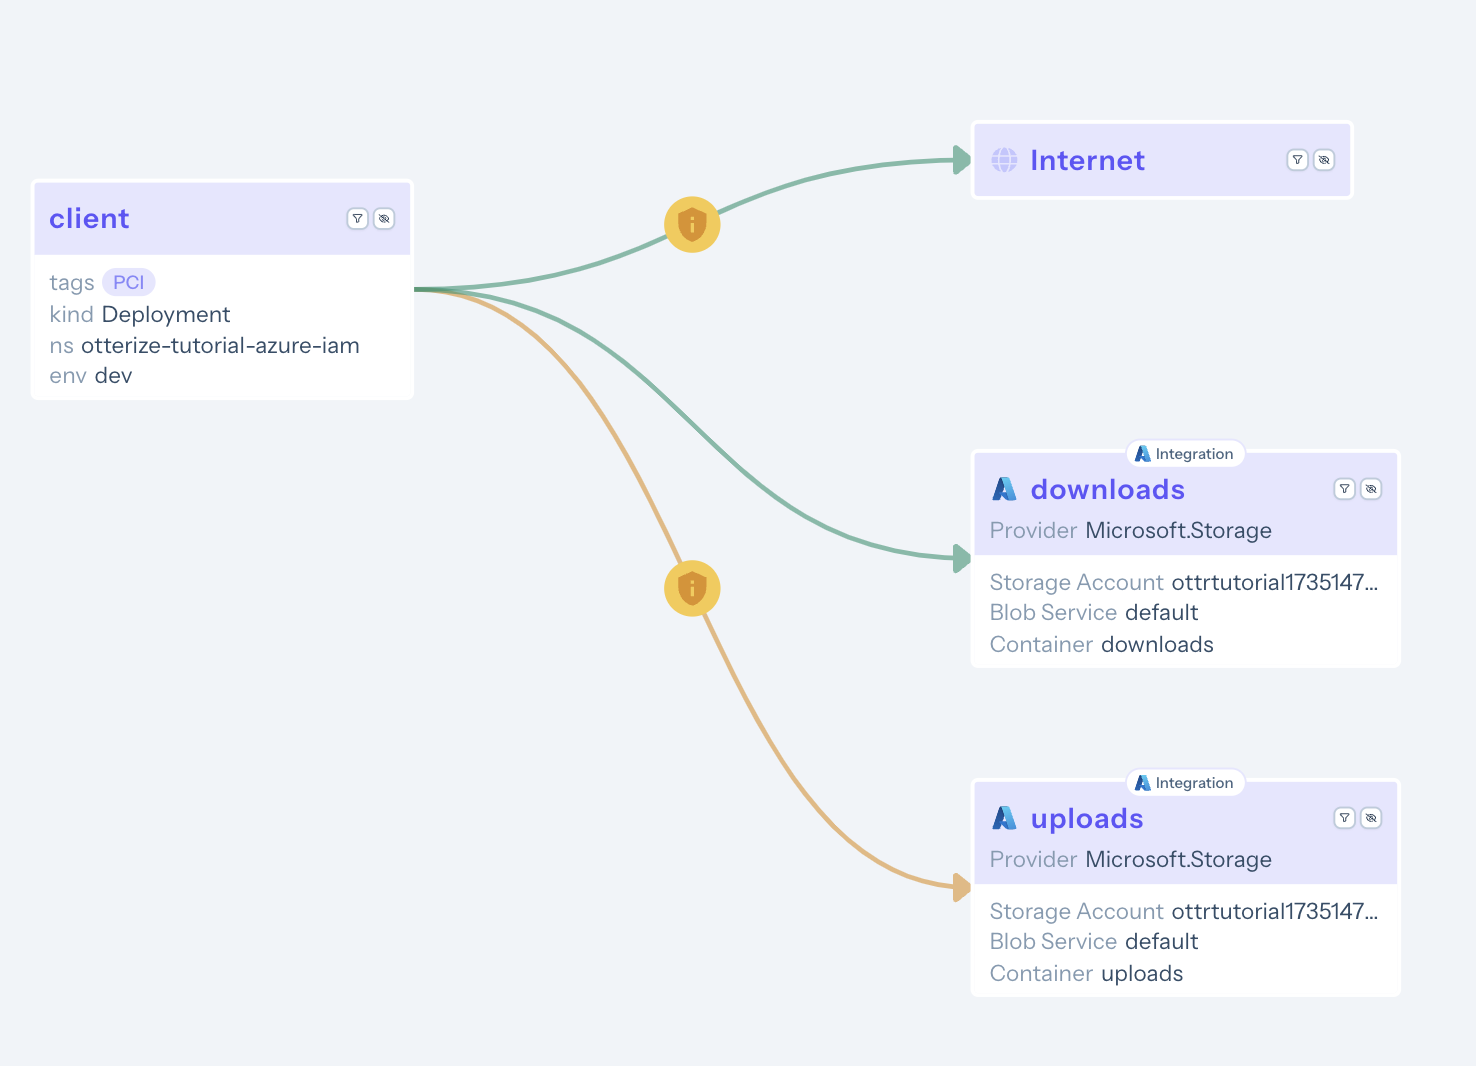
The file is successfully downloaded from the downloads container, but the client fails to upload it to the uploads container. This is because some permissions are still missing. Let's take a look at the access graph at Otterize Cloud:

The access graph visualizes the applied ClientIntents in green, while the newly discovered intents, which are still missing permissions, are shown in yellow.
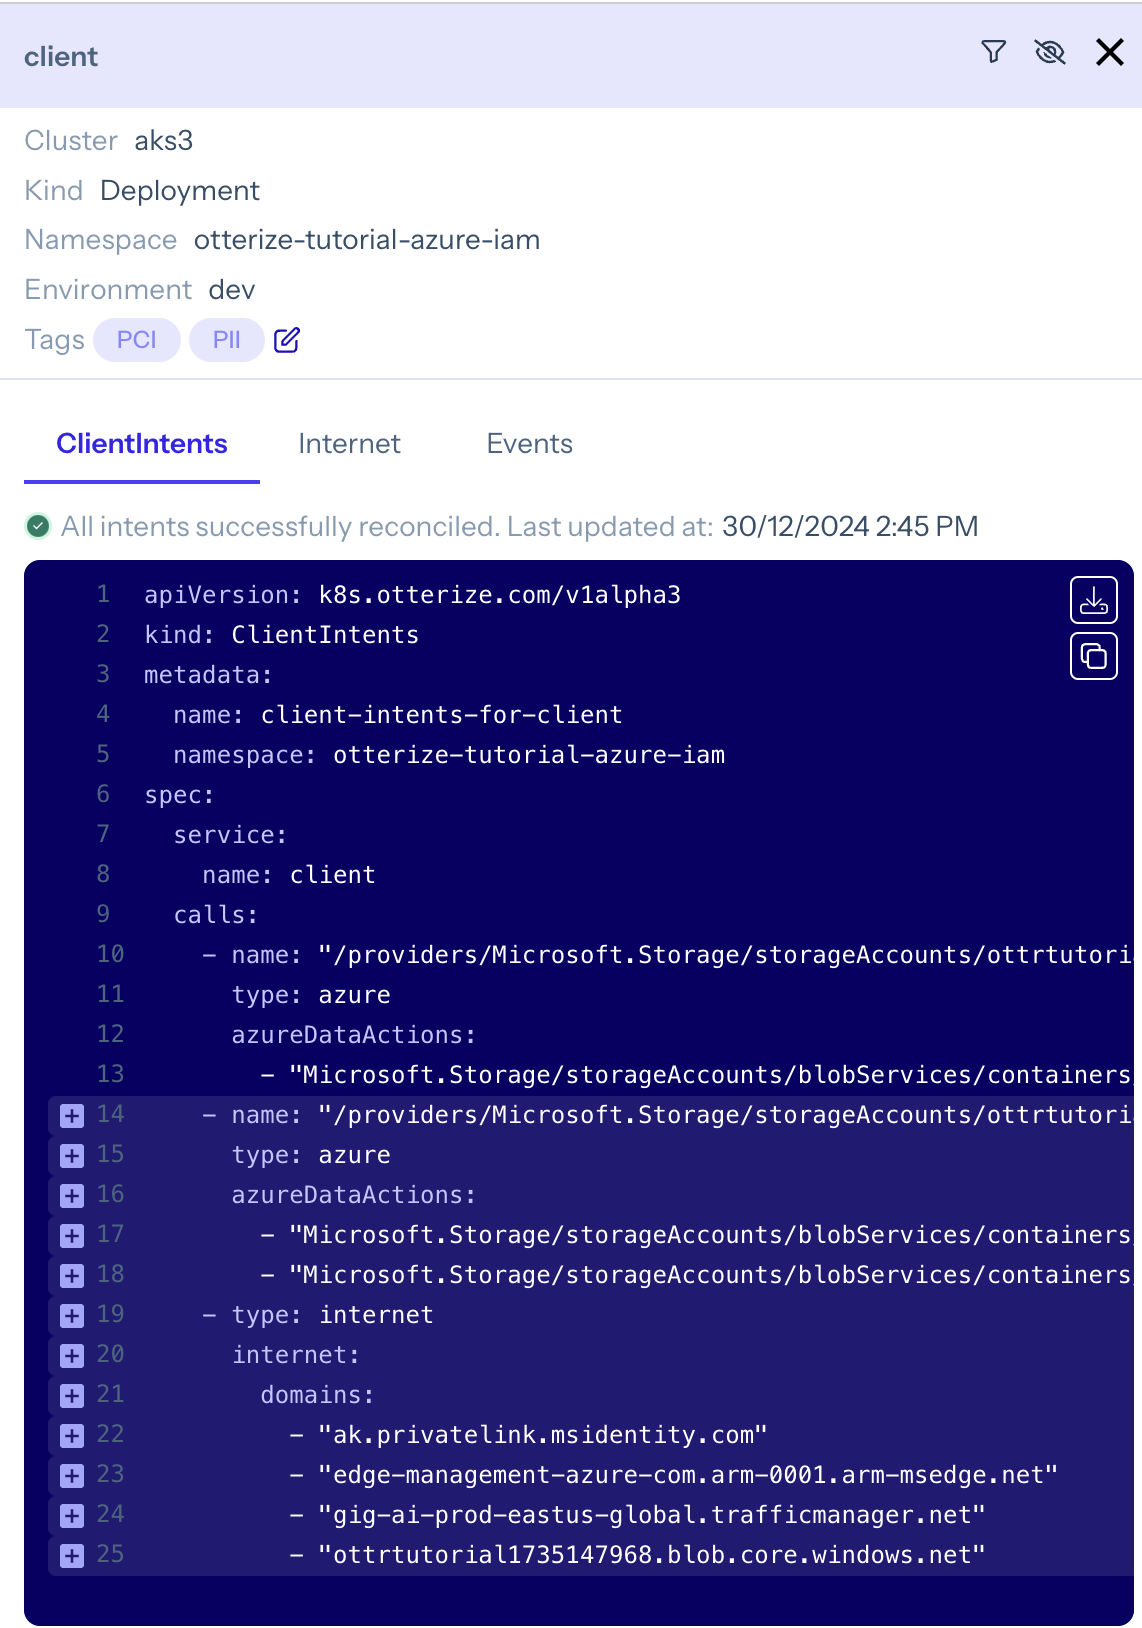
By clicking on the client node, you can view and download the full set of ClientIntents required for it to access both buckets:

Use the otterize CLI to download and apply the intents to the cluster:
otterize clientintents export -n otterize-tutorial-azure-iam -v v2 | kubectl apply -f-
Complete ClientIntents file:
apiVersion: k8s.otterize.com/v2beta1
kind: ClientIntents
metadata:
  name: client-intents-for-client
  namespace: otterize-tutorial-azure-iam
spec:
  workload:
    name: client
    kind: Deployment
  targets:
    - azure:
        scope: /providers/Microsoft.Storage/storageAccounts/STORAGE_ACCOUNT_NAME/blobServices/default/containers/downloads
        dataActions:
          - Microsoft.Storage/storageAccounts/blobServices/containers/blobs/read
    - azure:
        scope: /providers/Microsoft.Storage/storageAccounts/STORAGE_ACCOUNT_NAME/blobServices/default/containers/uploads
        dataActions:
          - Microsoft.Storage/storageAccounts/blobServices/containers/blobs/add/action
          - Microsoft.Storage/storageAccounts/blobServices/containers/blobs/write
Azure role assignments may take up to 10 minutes to take effect. This is a known limitation of Azure RBAC. If you are still seeing access errors in the client logs, wait a few minutes and try again.
What's next?
Try out some of the other quick tutorials to learn about how to use ClientIntents to manage network policies, Istio policies, PostgreSQL access, and more. You can use a single ClientIntents resource to specify all the access required for a pod.
Teardown
To remove the deployed examples run:
kubectl delete namespace otterize-tutorial-azure-iam
To delete the Azure blob storage account & container:
az storage account delete --name $STORAGE_ACCOUNT_NAME --resource-group $RESOURCE_GROUP
To delete the cluster, if you created the one in this tutorial:
az aks delete --name $AKS_CLUSTER_NAME --resource-group $RESOURCE_GROUP