Linkerd AuthorizationPolicy automation
Otterize automates mTLS-based, HTTP-level pod-to-pod access control with Linkerd authorization (authZ) policies, within your Kubernetes cluster.
Implementing this kind of access control with Linkerd can be challenging.
For example, each target server needs a matching Server resource, MeshTLSAuthentication resources need to be created & matched with identities
in order to use mTLS based authorization policies, etc. Using Otterize ClientIntents, this is all managed for you.
To help you avoid manually managing complicated authorization policies per server, Otterize implements intent-based access control (IBAC). You just declare what calls the client pods intend to make, and everything is automatically wired together so only intended calls are allowed.
In this tutorial, we will:
- Deploy a Linkerd demo application with two client pods and one server pod.
- Declare that the first client intends to call the server with a specific HTTP path and method.
- See that a Linkerd
Serverresource was created for our target, aMeshTLSAuthenticationresource was created for our client, and anAuthorizationPolicywas autogenerated to allow that traffic, and to block the (undeclared) calls from the other client.
Prerequisites
1. Install Linkerd
Install Linkerd by following the Installing Linkerd tutorial.
2. Deploy Otterize
If you do not have a cluster, we will need to prepare one with network policy support
To deploy Otterize, head over to Otterize Cloud and associate a Kubernetes cluster on the Integrations page, and follow the instructions. If you already have a Kubernetes cluster connected, skip this step.
Otterize should be deployed with enforcement on.
Tutorial
Deploy the two clients and the server
Deploy a simple example consisting of client and other-client calling nginx over HTTP:
curl https://docs.otterize.com/code-examples/linkerd-authorization-policies/all.yaml | linkerd inject - | kubectl apply -f -
Notice we use linkerd inject from Linkerd's CLI beforce we apply our resources to Kubernetes, to include them as part of the mesh.
Apply intents
We will now declare that the client intends to call the server at a particular HTTP path using a specific HTTP method.
When the intents YAML is applied, creating a custom resource of type ClientIntents,
Otterize will start creating Linkerd resources to enable the intended access and to block non-declared access:
- A
Serverresource is created for the target in theClientIntents(if required). AServerresource represents a service in the mesh that listens for incoming requests. It's configured to define the service's protocol, port, and other relevant settings. - A
MeshTLSAuthenticationresource that is used to represent mesh identities, which will be created for our client. - An
HTTPRoutethat will represent a single path, allowing for more fine-grained enforcement. This will be attached to theServerresource. - Finally, an
AuthorizationPolicyto bind it all together - enabling the intended traffic from (client → server with the declared path and method) and block all unintended calls (e.g., client-other → server).
You can click on the services or the lines connecting them to see which ClientIntents you need to apply to make the connection go green!
- Here is the
intents.yamldeclaration of the client, which we will apply below:
apiVersion: k8s.otterize.com/v2beta1
kind: ClientIntents
metadata:
  name: client
  namespace: otterize-tutorial-linkerd
spec:
  workload:
    name: client
    kind: Deployment
  targets:
    - kubernetes:
        name: nginx
        kind: Deployment
        http:
          - path: /client-path
            methods: [ GET ]
To apply it, use:
kubectl apply -n otterize-tutorial-linkerd -f https://docs.otterize.com/code-examples/linkerd-authorization-policies/intents.yaml
See it in action
Optional: check deployment status
```bash
kubectl get pods -n otterize-tutorial-linkerd
```

You should see

```
NAME                           READY   STATUS    RESTARTS   AGE
client-68b775f766-749r4         2/2     Running   0          32s
nginx-c646898-2lq7l             2/2     Running   0          32s
other-client-74cc54f7b5-9rctd   2/2     Running   0          32s
```
Monitor both client attempts to call the server with additional terminal windows, so we can see the effects of our changes in real time.
- Open a new terminal window [client] and tail the client log:
kubectl logs -f --tail 1 -n otterize-tutorial-linkerd deploy/client
Expected output
At this point the client should be able to communicate with the server:

```
Calling server...
HTTP/1.1 200 OK
...
hello from /client-path
```
- Open another terminal window [client-other] and tail the other-client log:
kubectl logs -f --tail 1 -n otterize-tutorial-linkerd deploy/other-client
Expected output
At this point the client should be able to communicate with the server:

```
Calling server...
HTTP/1.1 200 OK
...
hello from /other-client-path
```
Keep an eye on the logs being tailed in the [other-client] terminal window,
and apply this intents.yaml file in your main terminal window using:
kubectl apply -f https://docs.otterize.com/code-examples/linkerd-authorization-policies/intents.yaml
Client intents are the cornerstone of intent-based access control (IBAC).
as expected since it didn't declare its intents:
Calling server...
HTTP/1.1 200 OK
...
hello from /other-client-path  # <- before applying the intents file
Calling server...              # <- after applying the intents file
curl timed out
Terminated
- And in the [client] terminal you should see that calls go through, as expected since they were declared:
Calling server...
HTTP/1.1 200 OK
...
hello from /client-path
View it in the cloud
Go back to see the access graph in your browser:
And upon clicking the green arrow:

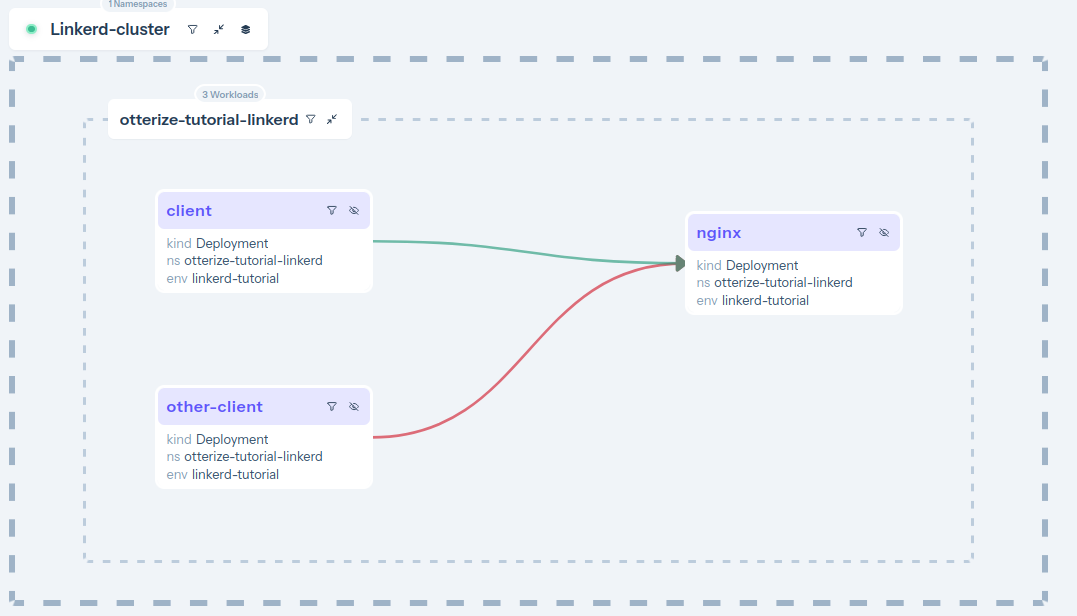
It's now clear what happened:
- The server is now protected, and is also blocking some of its clients.
- Calls from [client] → [nginx] are declared and therefore allowed (green arrow).
- Calls from [client-other] → [nginx] are not declared and therefore blocked (red arrow). Click on the arrow to see what to do about it.
Otterize did its job of both protecting the server and allowing intended access.
What did we accomplish?
Controlling access through Linkerd authorization policies no longer means having to write AuthorizationPolicies, Server, MeshTLSAuth or HTTPRoute resources.
Otterize generated a specific Linkerd authorization policy on the ingress of the pod of the server, allowing the server to
be accessed by the pod of the client, based on that client's declared intent. Otterize automated the creation of a Server resource
and its pairing with the target server through labels, the creation of a MeshTLSAuthentication resource and its pairing with the client's service account,
and binding it all to an AuthorizationPolicy to protect the server and allow only intended access.
Otterize saved us from doing all this work: by simply declaring the client's intents in intents.yaml,
all the appropriate configuration was managed automatically behind the scenes.
Have a look at the Linkerd resources that Otterize automatically generated:
- Server
- MeshTLSAuthentication
- HTTPRoute
- AuthorizationPolicy
This represents a server in the mesh that listens for incoming requests. It's configured to define the service's protocol, port, and other relevant settings. Matched with the target pod using label selectors, autogenerated by Otterize.
apiVersion: policy.linkerd.io/v1beta3
kind: Server
metadata:
  name: server-for-nginx-port-80
  namespace: otterize-tutorial-linkerd
spec:
  accessPolicy: deny
  podSelector:
    matchLabels:
      # Pods are automatically labeled by Otterize
      intents.otterize.com/service: nginx-otterize-tutorial-li-efa4db
  # Automatically determined by looking up the Kubernetes Service for this server
  port: 80
  proxyProtocol: unknown
Otterize pairs MeshTLSAuthentication with the client workload's service account.
apiVersion: policy.linkerd.io/v1alpha1
kind: MeshTLSAuthentication
metadata:
  name: meshtls-for-client-client
  namespace: otterize-tutorial-linkerd
spec:
  identities:
    # Automatically determined by looking up the Kubernetes ServiceAccount for this client
    - client-service-account.otterize-tutorial-linkerd.serviceaccount.identity.linkerd.cluster.local
An HTTPRoute defines a set of rules which match HTTP requests to that resource. It is attached to a "parent" resource - in this case, the previously created Server resource.
apiVersion: policy.linkerd.io/v1beta3
kind: HTTPRoute
metadata:
  name: http-route-for-nginx-port-80-bc98e3
  namespace: otterize-tutorial-linkerd
spec:
  parentRefs:
    - group: policy.linkerd.io
      kind: Server
      name: server-for-nginx-port-80
  rules:
    - matches:
        - path:
            type: PathPrefix
            value: /client-path
Which binds it all together and mentions the HTTPRoute or Server (The thing to be authorized) and the MeshTLSAuthentication (the clients that have autorization).
apiVersion: policy.linkerd.io/v1alpha1
kind: AuthorizationPolicy
metadata:
  name: authpolicy-to-nginx-port-80-from-client-client-scmc2e2s
  namespace: otterize-tutorial-linkerd
spec:
  requiredAuthenticationRefs:
    - group: policy.linkerd.io
      kind: MeshTLSAuthentication
      # Automatically generated by Otterize
      name: meshtls-for-client-client
  targetRef:
    group: policy.linkerd.io
    kind: HTTPRoute
    # Automatically generated by Otterize
    name: http-route-for-nginx-port-80-bc98e3
Try to create an intents file yourself for client-other, and apply it to allow this other client to call the server.
Teardown
To remove Linkerd and the deployed examples run:
kubectl delete namespace otterize-tutorial-linkerd
linkerd uninstall | kubectl delete -f -