PostgreSQL table-level access mapping
Otterize visualizes table-level access to PostgreSQL databases, by collecting PostgreSQL audit logs and associating them with the client workload identities.
In this tutorial, we will:
- Optionally, prepare a Kubernetes cluster and connect it to Otterize Cloud
- Optionally, deploy a Cloud SQL for PostgreSQL instance
- Deploy a PostgreSQL client pod that queries the Cloud SQL server
- Configure the Cloud SQL server to enable database auditing and route the audit logs to a Pub/Sub destination
- Create an Otterize database integration and configure visibility log collection
- Create a ClientIntents resource allowing access from the PostgreSQL client pod to the Cloud SQL server
Visibility log collection is currently available only for PostgreSQL instances running on GCP Cloud SQL.
Prerequisites
Prepare a Kubernetes cluster and connect it to Otterize Cloud
Already have Otterize deployed with the database integration configured on your cluster? Skip to the tutorial.
Prepare a Kubernetes cluster
- Minikube
- Google GKE
- AWS EKS
- Azure AKS
If you don't have the Minikube CLI, first install it.
Then start your Minikube cluster with Calico, in order to enforce network policies.
minikube start --cpus=4 --memory 4096 --disk-size 32g --cni=calico
The increased CPU, memory and disk resource allocations are required to be able to deploy the ecommerce app used in the visual tutorials successfully.
- gcloud CLI
- Console
To use the gcloud CLI for this tutorial, first install and then initialize it.
To enable network policy enforcement when creating a new cluster:
Run the following command:
gcloud container clusters create CLUSTER_NAME --enable-network-policy --zone=ZONE
(Replace CLUSTER_NAME with the name of the new cluster and ZONE with your zone.)
To enable network policy enforcement for an existing cluster, perform the following tasks:
Run the following command to enable the add-on:
gcloud container clusters update CLUSTER_NAME --update-addons=NetworkPolicy=ENABLED
(Replace CLUSTER_NAME with the name of the cluster.)
Then enable network policy enforcement on your cluster, re-creating your cluster's node pools with network policy enforcement enabled:
gcloud container clusters update CLUSTER_NAME --enable-network-policy
(Replace CLUSTER_NAME with the name of the cluster.)
To enable network policy enforcement when creating a new cluster:
Go to the Google Kubernetes Engine page in the Google Cloud console. The remaining steps will appear automatically in the Google Cloud console.
On the Google Kubernetes Engine page, click Create.
Configure your cluster as desired.
From the navigation pane, under Cluster, click Networking.
Select the checkbox to Enable network policy.
Click Create.
To enable network policy enforcement for an existing cluster:
Go to the Google Kubernetes Engine page in the Google Cloud console. The remaining steps will appear automatically in the Google Cloud console.
In the cluster list, click the name of the cluster you want to modify.
Under Networking, in the Network policy field, click Edit network policy.
Select the checkbox to Enable network policy for master and click Save Changes.
Wait for your changes to apply, and then click Edit network policy again.
Select the checkbox to Enable network policy for nodes.
Click Save Changes.
Starting August 29, 2023, you can configure the built-in VPC CNI add-on to enable network policy support.
To spin up a new cluster, use the following eksctl ClusterConfig, and save it to a file called cluster.yaml.
Spin up the cluster using eksctl create cluster -f cluster.yaml. This will spin up a cluster called network-policy-demo in us-west-2.
The important bit is the configuration for the VPC CNI addon:
    configurationValues: |-
      enableNetworkPolicy: "true"
apiVersion: eksctl.io/v1alpha5
kind: ClusterConfig

metadata:
  name: network-policy-demo
  version: "1.27"
  region: us-west-2

iam:
  withOIDC: true

vpc:
  clusterEndpoints:
    publicAccess: true
    privateAccess: true

addons:
  - name: vpc-cni
    version: 1.14.0
    attachPolicyARNs: #optional
    - arn:aws:iam::aws:policy/AmazonEKS_CNI_Policy
    configurationValues: |-
      enableNetworkPolicy: "true"
  - name: coredns
  - name: kube-proxy

managedNodeGroups:
  - name: x86-al2-on-demand
    amiFamily: AmazonLinux2
    instanceTypes: [ "m6i.xlarge", "m6a.xlarge" ]
    minSize: 0
    desiredCapacity: 2
    maxSize: 6
    privateNetworking: true
    disableIMDSv1: true
    volumeSize: 100
    volumeType: gp3
    volumeEncrypted: true
    tags:
      team: "eks"
For guides that deploy the larger set of workloads, Kafka and ZooKeeper are also deployed, and you will also need the EBS CSI driver to accommodate their storage needs. Follow the AWS guide for the EBS CSI add-on to do so. If you're not using the VPC CNI, you can set up the Calico network policy controller using the following instructions:
Visit the official documentation, or follow the instructions below:- Spin up an EKS cluster using the console, AWS CLI or
eksctl. - Install Calico for network policy enforcement, without replacing the CNI:
kubectl apply -f https://raw.githubusercontent.com/aws/amazon-vpc-cni-k8s/v1.12.6/config/master/calico-operator.yaml
kubectl apply -f https://raw.githubusercontent.com/aws/amazon-vpc-cni-k8s/v1.12.6/config/master/calico-crs.yaml
You can set up an AKS cluster using this guide.
For network policy support, no setup is required: Azure AKS comes with a built-in network policy implementation called Azure Network Policy Manager. You can choose whether you'd like to use this option or Calico when you create a cluster.
Read more at the official documentation site.Install Otterize in your cluster, with Otterize Cloud
Create an Otterize Cloud account
If you don't already have an account, browse to https://app.otterize.com to set one up.
If someone in your team has already created an org in Otterize Cloud, and invited you (using your email address), you may see an invitation to accept.
Otherwise, you'll create a new org, which you can later rename, and invite your teammates to join you there.
Install Otterize OSS, connected to Otterize Cloud
If no Kubernetes clusters are connected to your account, click the "Create integration" button and then click the "Add integration" button to:
- Create a Kubernetes integration, specifying its name and the name of an environment to which all namespaces in that cluster will belong, by default.
- Connect it with your actual Kubernetes cluster, by running the Helm commands shown on the screen after creating the integration.
- Follow the instructions to install Otterize with enforcement on (use the toggle to make
Enforcement mode: active)
- Follow the instructions to install Otterize with enforcement on (use the toggle to make
More details, if you're curious
Connecting your cluster simply entails installing Otterize OSS via Helm, using credentials from your account so Otterize OSS can report information needed to visualize the cluster.
The credentials will already be inlined into the Helm command shown in the Cloud UI, so you just need to copy that line and run it from your shell. If you don't give it the Cloud credentials, Otterize OSS will run fully standalone in your cluster — you just won't have the visualization in Otterize Cloud.
The Helm command shown in the Cloud UI also includes flags to turn off enforcement: Otterize OSS will be running in "shadow mode," meaning that it will show you what would happen if it were to create/update your access controls (Kubernetes network policies, Kafka ACLs, Istio authorization policies, etc.). While that's useful for gradually rolling out IBAC, for this tutorial we go straight to active enforcement.
Prepare a Cloud SQL for PostgreSQL instance
Already have a Cloud SQL for PostgreSQL instance ready? Skip to the tutorial.
Deploy a Cloud SQL for PostgreSQL instance
Follow the installation instructions on the Google Cloud SQL documentation.
Tutorial
Deploy a PostgreSQL client
At this step of the tutorial, you will be deploying a dummy postgres client application which will query your Cloud SQL instance periodically, approximately once a minute. This will generate visibility logs which will be consumed by Otterize Cloud.
Run the following commands, replacing <PGHOST>, <PGUSER> & <PGPASSWORD> with the IP address & credentials for your Cloud SQL for PostgreSQL instance:
export PGHOST="<PGHOST>"
export PGUSER="<PGUSER>"
export PGPASSWORD="<PGPASSWORD>"
export PGPORT="5432"
export TUTORIAL_DB="otterize_tutorial"
export TUTORIAL_TABLE="users"

kubectl create namespace otterize-tutorial-postgresql-visibility

# Create a database and a table to be used for the dummy application
kubectl run -i --tty --rm --image andreswebs/postgresql-client --restart=Never -n otterize-tutorial-postgresql-visibility \
  --env PGHOST=$PGHOST --env PGPORT=$PGPORT --env PGUSER=$PGUSER --env PGPASSWORD=$PGPASSWORD \
  -- psql -c "CREATE DATABASE $TUTORIAL_DB;"
kubectl run -i --tty --rm --image andreswebs/postgresql-client --restart=Never -n otterize-tutorial-postgresql-visibility \
  --env PGHOST=$PGHOST --env PGPORT=$PGPORT --env PGUSER=$PGUSER --env PGPASSWORD=$PGPASSWORD \
  -- psql --dbname $TUTORIAL_DB -c "CREATE TABLE IF NOT EXISTS $TUTORIAL_TABLE (id serial PRIMARY KEY); insert into users values (default);"

# deploy the dummy postgres client application
kubectl create secret generic psql-credentials -n otterize-tutorial-postgresql-visibility \
    --from-literal=username="$PGUSER" \
    --from-literal=password="$PGPASSWORD"
kubectl create configmap psql-host -n otterize-tutorial-postgresql-visibility \
    --from-literal=pghost="$PGHOST" \
    --from-literal=pgport="$PGPORT" \
    --from-literal=pgdatabase="$TUTORIAL_DB" \
    --from-literal=pgtable="$TUTORIAL_TABLE"
kubectl apply -f https://docs.otterize.com/code-examples/postgresql-visibility/psql-client.yaml -n otterize-tutorial-postgresql-visibility
Configure the Cloud SQL server to enable database auditing
Otterize utilizes PostgreSQL audit logs generated using the pgAudit extension.
Follow the instructions on GCP docs to configure audit for PostgreSQL using pgAudit on your Cloud SQL instance.
- For the pgaudit.log flag, select the pgaudit.log=all log level.
- After completing the setup, open the GCP Logs Explorer application, and apply the following filter to see audit logs collected from your Cloud SQL instance:
resource.type="cloudsql_database"
protoPayload.request.@type="type.googleapis.com/google.cloud.sql.audit.v1.PgAuditEntry"
logName="projects/<GCP_PROJECT_ID>/logs/cloudaudit.googleapis.com%2Fdata_access"
resource.labels.database_id="<GCP_PROJECT_ID>:<CLOUDSQL_INSTANCE_NAME>"
If your Cloud SQL instance is handling any requests, you should be seeing audit records generated by it periodically.
Route Cloud SQL audit logs to a Pub/Sub destination
Otterize Cloud consumes audit logs collected from your Cloud SQL instancec by subscribing to a pub/sub topic in your GCP project.
Follow the instructions for third-party integrations with Pub/Sub on GCP docs to configure a log sink and route your Cloud SQL instance's audit logs through a Pub/Sub topic, and allow Otterize Cloud to subscribe to it.
- Under logs to include, provide the following filter to include all audit logs generated by pgAudit
for the Cloud SQL instance you are using for this tutorial:
resource.type="cloudsql_database"
protoPayload.request.@type="type.googleapis.com/google.cloud.sql.audit.v1.PgAuditEntry"
logName="projects/<GCP_PROJECT_ID>/logs/cloudaudit.googleapis.com%2Fdata_access"
resource.labels.database_id="<GCP_PROJECT_ID>:<CLOUDSQL_INSTANCE_NAME>" - For the third-party service account name, use Otterize Cloud service account:
If your Cloud SQL instance is handling any requests, you may now open your Pub/Sub topic's metrics page and observe how audit log records are being directed to it.
Apply a PostgreSQLServerConfig in your cluster
To enable Otterize operators to access your database, apply a PostgreSQLServerConfig in your cluster:
apiVersion: k8s.otterize.com/v2beta1
kind: PostgreSQLServerConfig
metadata:
  name: otterize-tutorial-cloudsql # database instance name - should match the target in ClientIntents
spec:
  address: <PGHOST:PGPORT> # Your CloudSQL database address
  credentials:
    # Username Otterize will connect with & configure permissions as; optional, can be omitted if using a secretRef
    username: <PGUSER>
    # Password for the above username; optional, can be omitted if using a secretRef
    password: <PGPASSWORD>
    # Secret containing the postgres credentials; optional, can be omitted if using the above username & password fields
    secretRef:
      # Name of the secret containing the postgres credentials; required
      name: postgres-credentials
Create an Otterize database integration and configure visibility log collection
To configure Otterize Cloud to subscribe and start consuming your Cloud SQL instance's audit logs, create an Otterize database integration and configure it with your GCP project and Pub/Sub topic:
- Navigate to the Integrations page on Otterize Cloud and click the + Add Integration button to create a new integration
- Choose the Database integration type
- Name your integration otterize-tutorial-cloudsql
- Under Visibility settings, choose to collect visibility logs using a GCP Pub/Sub topic
- Enter your GCP Project ID & Topic name
- Click Test Visibility to ensure that Otterize Cloud is able to subscribe to your Pub/Sub topic
- Click Add to finish setting up your database integration
At this point, Otterize's database integration will start collecting visibility logs from your Pub/Sub topic, and view them in the Access graph.
If you deployed the dummy postgres application used earlier in this tutorial, you should start seeing connections from the psql-client app to your Cloud SQL server after about one minute.
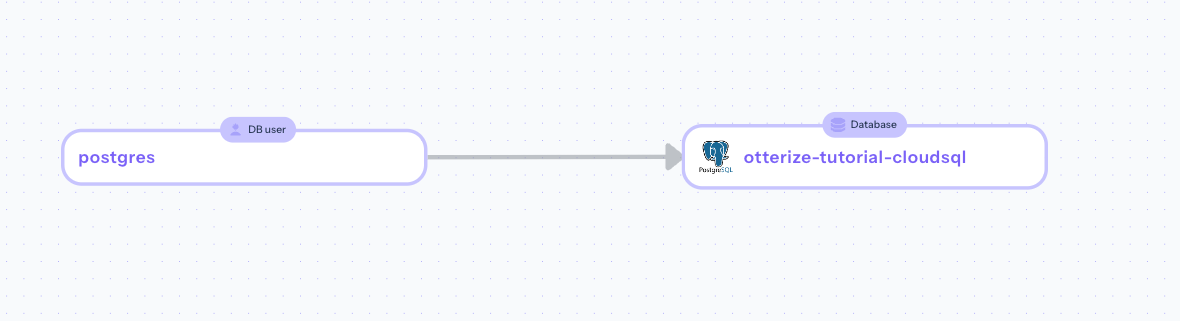
Click on the node titled postgres to view additional information about the discovered traffic from the psql-client app:
Create a ClientIntents resource allowing access from the PostgreSQL client pod to the Cloud SQL server
At this point, Otterize Cloud is able to monitor and visualize your database access. Next, we will configure Otterize OSS to generate just-in-time PostgreSQL client credentials for the client application, and apply a permissive ClientIntents resource allowing the client application access to the Cloud SQL instance. This will create private credentials, used by the client application and by it only, which enables workload-level visibility and least privilege access to your Cloud SQL instance.
- Delete the secret containing common psql credentials, generated earlier in this tutorial:
kubectl delete secret psql-credentials -n otterize-tutorial-postgresql-visibility
- Annotate the psql-client app with
credentials-operator.otterize.com/user-password-secret-name:psql-credentials, to start generating just-in-time client credentials for it:
kubectl patch cronjob psql-client -n otterize-tutorial-postgresql-visibility -p \
  '{"spec": {"jobTemplate": {"spec": {"template": {"metadata": {"annotations": {"credentials-operator.otterize.com/user-password-secret-name": "psql-credentials"}}}}}}}'
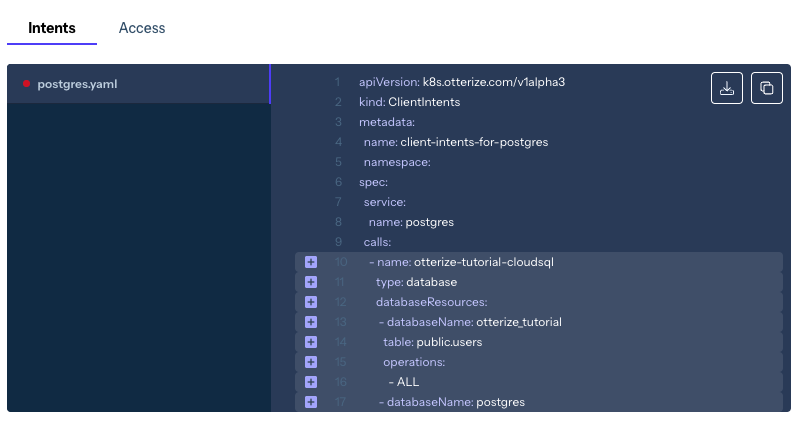
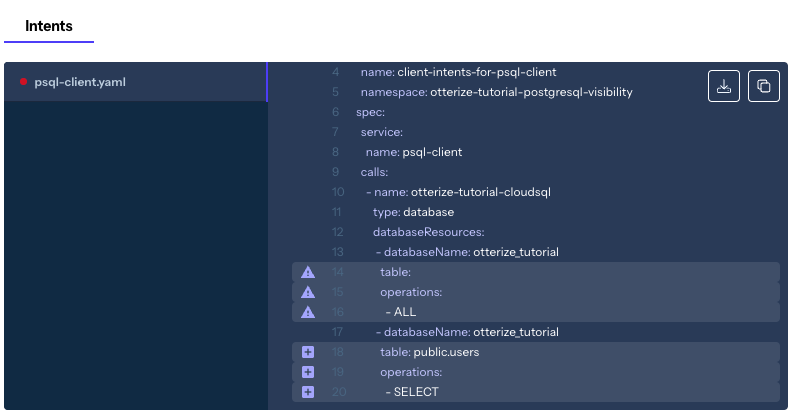
- Apply a ClientIntents resource for the psql client application, allowing all access to the Cloud SQL DB:
kubectl apply -f https://docs.otterize.com/code-examples/postgresql-visibility/psql-client-clientintents.yaml -n otterize-tutorial-postgresql-visibility
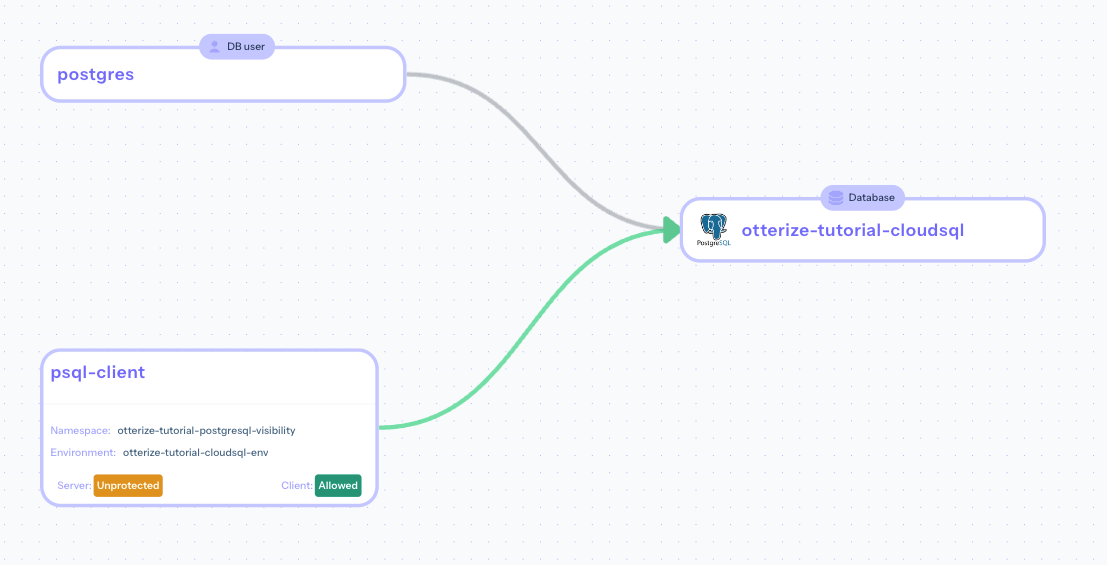
You should now see the access graph updated with an edge connecting the psql-client app to your Cloud SQL server:
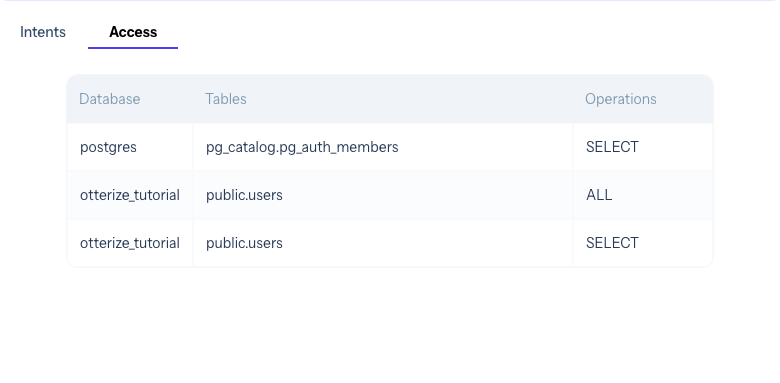
Click on the node titled psql-client to see Otterize's suggestion about applying least privilege ClientIntents for it, based on the discovered traffic seen from your audit logs:
Teardown
To remove the deployed examples:
- Delete the database used by the dummy application:
kubectl run -i --tty --rm --image andreswebs/postgresql-client --restart=Never -n otterize-tutorial-postgresql-visibility \
  --env PGHOST=$PGHOST --env PGPORT=$PGPORT --env PGUSER=$PGUSER --env PGPASSWORD=$PGPASSWORD \
  -- psql -c "DROP DATABASE $TUTORIAL_DB;"
- Delete the Kubernetes namespace used by this tutorial:
kubectl delete namespace otterize-tutorial-postgresql-visibility