Kafka access automation using Otterize Cloud mTLS
This tutorial will walk you through declaring and applying intents to easily secure access to Kafka running inside a Kubernetes cluster, automating the management of Kafka ACLs, and the generation and deployment of certificates for mTLS between Kafka and its clients using Otterize Cloud as the certificate provider.
If you prefer to generate certificates using cert-manager, try the tutorial for cert-manager.
In this tutorial, we will:
- Deploy Otterize with network policy enforcement disabled to focus on Kafka ACL enforcement
- Deploy a Kafka broker with 2 topics, and two clients that call these topics.
- Declare that one client pod intends to access one of the topic.
- Enable protection for this Kafka broker.
- See that an ACL was auto-generated to allow just that, while blocking calls to that topic from the other client.
Prerequisites
Already have Otterize & a Kafka broker deployed on your cluster? Skip to the tutorial.
1. Deploy Otterize
To deploy Otterize, head over to Otterize Cloud and associate a Kubernetes cluster on the Integrations page, and follow the instructions. If you already have a Kubernetes cluster connected, skip this step.
Note:
- Under Select certificate provider (mTLS and Kafka support) choose Otterize Cloud.
- Copy the Helm command and add the following flags:
--set intentsOperator.operator.enableNetworkPolicyCreation=false \
--set networkMapper.kafkawatcher.enable=true \
--set networkMapper.kafkawatcher.kafkaServers={"kafka-0.kafka"}
Note that enforcement is disabled, we will enable it later.
2. Install Kafka
We will deploy a Kafka broker using Bitnami's Helm chart. In the chart we will configure Kafka to:
- Recognize the Otterize intents operator as a super user so it can configure ACLs;
- Use TLS/SSL for its listeners;
- Tell the Otterize credentials operator, via pod annotations, how credentials should be created;
- Authenticate clients using mTLS credentials provided as a Kubernetes secret; and
- Allow access to any topic by default unless denied by an ACL (achieved using
allowEveryoneIfNoAclFound: true).
Expand to see the Helm values.yaml used with the Bitnami chart
# Configure Otterize as a super user to grant it access to configure ACLs
superUsers: "User:CN=kafka.kafka,O=SPIRE,C=US;User:CN=intents-operator.otterize-system,O=SPIRE,C=US;User:CN=kafka.kafka;User:CN=intents-operator.otterize-system"
# Use TLS for the Kafka listeners (Kafka calls them SSL)
listeners:
  - "CLIENT://:9092"
  - "INTERNAL://:9093"
advertisedListeners:
  - "CLIENT://:9092"
  - "INTERNAL://:9093"
listenerSecurityProtocolMap: "INTERNAL:SSL,CLIENT:SSL"
# For a gradual rollout scenario we will want to keep the default permission for topics as allowed, unless an ACL was set
allowEveryoneIfNoAclFound: true
# Annotations for Otterize to generate credentials
podAnnotations:
  credentials-operator.otterize.com/cert-type: jks
  credentials-operator.otterize.com/tls-secret-name: kafka-tls-secret
  credentials-operator.otterize.com/dns-names: "kafka-0.kafka-headless.kafka.svc.cluster.local,kafka.kafka.svc.cluster.local"
# Authenticate clients using mTLS
auth:
  clientProtocol: mtls
  interBrokerProtocol: mtls
  tls:
    type: jks
    existingSecrets:
      - kafka-tls-secret
    password: password
    jksTruststore: truststore.jks
    jksKeystoreSAN: keystore.jks
authorizerClassName: kafka.security.authorizer.AclAuthorizer
# Allocate resources
resources:
  requests:
    cpu: 50m
    memory: 256Mi
log4j: |
  # Unspecified loggers and loggers with additivity=true output to server.log and stdout
  # Note that INFO only applies to unspecified loggers, the log level of the child logger is used otherwise

  log4j.rootLogger=INFO, stdout, kafkaAppender

  log4j.appender.stdout=org.apache.log4j.ConsoleAppender
  log4j.appender.stdout.layout=org.apache.log4j.PatternLayout
  log4j.appender.stdout.layout.ConversionPattern=[%d] %p %m (%c)%n

  log4j.appender.kafkaAppender=org.apache.log4j.ConsoleAppender
  log4j.appender.kafkaAppender.layout=org.apache.log4j.PatternLayout
  log4j.appender.kafkaAppender.layout.ConversionPattern=[%d] %p %m (%c)%n

  log4j.appender.stateChangeAppender=org.apache.log4j.ConsoleAppender
  log4j.appender.stateChangeAppender.layout=org.apache.log4j.PatternLayout
  log4j.appender.stateChangeAppender.layout.ConversionPattern=[%d] %p %m (%c)%n

  log4j.appender.requestAppender=org.apache.log4j.ConsoleAppender
  log4j.appender.requestAppender.layout=org.apache.log4j.PatternLayout
  log4j.appender.requestAppender.layout.ConversionPattern=[%d] %p %m (%c)%n

  log4j.appender.cleanerAppender=org.apache.log4j.ConsoleAppender
  log4j.appender.cleanerAppender.layout=org.apache.log4j.PatternLayout
  log4j.appender.cleanerAppender.layout.ConversionPattern=[%d] %p %m (%c)%n

  log4j.appender.controllerAppender=org.apache.log4j.ConsoleAppender
  log4j.appender.controllerAppender.layout=org.apache.log4j.PatternLayout
  log4j.appender.controllerAppender.layout.ConversionPattern=[%d] %p %m (%c)%n

  log4j.appender.authorizerAppender=org.apache.log4j.ConsoleAppender
  log4j.appender.authorizerAppender.layout=org.apache.log4j.PatternLayout
  log4j.appender.authorizerAppender.layout.ConversionPattern=[%d] %p %m (%c)%n


  # Change the line below to adjust ZK client logging
  log4j.logger.org.apache.zookeeper=INFO

  # Change the two lines below to adjust the general broker logging level (output to server.log and stdout)
  log4j.logger.kafka=INFO, stdout
  log4j.logger.org.apache.kafka=INFO

  # Change to DEBUG or TRACE to enable request logging
  log4j.logger.kafka.request.logger=WARN, requestAppender
  log4j.additivity.kafka.request.logger=false

  # Uncomment the lines below and change log4j.logger.kafka.network.RequestChannel$ to TRACE for additional output
  # related to the handling of requests
  #log4j.logger.kafka.network.Processor=TRACE, requestAppender
  #log4j.logger.kafka.server.KafkaApis=TRACE, requestAppender
  #log4j.additivity.kafka.server.KafkaApis=false
  log4j.logger.kafka.network.RequestChannel$=WARN, requestAppender
  log4j.additivity.kafka.network.RequestChannel$=false

  # Change the line below to adjust KRaft mode controller logging
  log4j.logger.org.apache.kafka.controller=INFO, controllerAppender
  log4j.additivity.org.apache.kafka.controller=false

  # Change the line below to adjust ZK mode controller logging
  log4j.logger.kafka.controller=TRACE, controllerAppender
  log4j.additivity.kafka.controller=false

  log4j.logger.kafka.log.LogCleaner=INFO, cleanerAppender
  log4j.additivity.kafka.log.LogCleaner=false

  log4j.logger.state.change.logger=INFO, stateChangeAppender
  log4j.additivity.state.change.logger=false

  # Access denials are logged at INFO level, change to DEBUG to also log allowed accesses
  log4j.logger.kafka.authorizer.logger=DEBUG, authorizerAppender
  log4j.additivity.kafka.authorizer.logger=false
The following command will deploy a Kafka broker with this chart:
helm repo add otterize https://helm.otterize.com
helm repo update
helm install --create-namespace -n kafka \
  -f https://docs.otterize.com/code-examples/kafka-mtls/helm/values.yaml kafka otterize/kafka --version 21.4.4
You can watch for all pods to be Ready using kubectl get pods -n kafka -w.
3. Configure Otterize to manage Kafka access
In our simple example, we'll call the Kafka broker service simply "kafka".
Let's tell Otterize how to connect to the Kafka broker by applying an Otterize KafkaServerConfig, naming it kafka. The name will be the name we later use to declare ClientIntents.
kubectl apply -f https://docs.otterize.com/code-examples/kafka-mtls/kafkaserverconfig.yaml
apiVersion: k8s.otterize.com/v2beta1
kind: KafkaServerConfig
metadata:
  name: kafkaserverconfig
  namespace: kafka
spec:
  workload:
    name: kafka
  addr: kafka.kafka:9092
Tutorial
Deploy clients
Our simple example consists of two client pods:
- One named "client".
- And one named "client-other".
These clients are connecting to Kafka using mTLS, with the credentials which they will receive from Otterize. Otterize makes this easy, requiring just 3 simple changes:
- Generate credentials: add the
credentials-operator.otterize.com/tls-secret-nameannotation, which tells Otterize to generate mTLS credentials and store them in a Kubernetes Secret whose name is the value of this annotation. - Expose credentials in a volume: add a volume containing this secret to the pod.
- Mount the volume: mount the volume in the pod.
Expand to see how to configure a Pod to mount the secret
spec:
  template:
    metadata:
      annotations:
        # 1. Generate credentials as a secret called "client-credentials-secret":
        credentials-operator.otterize.com/tls-secret-name: client-credentials-secret
        ...
    spec:
      volumes:
        # 2. Create a volume containing this secret:
        - name: otterize-credentials
          secret:
            secretName: client-credentials-secret
        ...
      containers:
        - name: client
          ...
          volumeMounts:
            # 3. Mount volume into container
            - name: otterize-credentials
              mountPath: /var/otterize/credentials
              readOnly: true
Expand to see the YAML for the pods used in this example
- client-deployment.yaml
- client-other-deployment.yaml
apiVersion: apps/v1
kind: Deployment
metadata:
  name: client
  namespace: otterize-tutorial-kafka-mtls
spec:
  selector:
    matchLabels:
      app: client
  template:
    metadata:
      labels:
        app: client
      annotations:
        credentials-operator.otterize.com/tls-secret-name: client-credentials-secret
    spec:
      containers:
        - name: client
          image: otterize/tutorial-kafka-client:latest
          imagePullPolicy: Always
          volumeMounts:
            - name: otterize-credentials
              mountPath: /var/otterize/credentials
              readOnly: true
      volumes:
        - name: otterize-credentials
          secret:
            secretName: client-credentials-secret
        - name: ephemeral
          emptyDir: { }
apiVersion: apps/v1
kind: Deployment
metadata:
  name: client-other
  namespace: otterize-tutorial-kafka-mtls
spec:
  selector:
    matchLabels:
      app: client-other
  template:
    metadata:
      labels:
        app: client-other
      annotations:
        credentials-operator.otterize.com/tls-secret-name: client-other-credentials-secret
    spec:
      containers:
        - name: client-other
          image: otterize/tutorial-kafka-client-second:latest
          imagePullPolicy: Always
          volumeMounts:
            - name: otterize-credentials
              mountPath: /var/otterize/credentials
              readOnly: true
      volumes:
        - name: otterize-credentials
          secret:
            secretName: client-other-credentials-secret
        - name: ephemeral
          emptyDir: { }
- Deploy the two clients into a namespace called
otterize-tutorial-kafka-mtlsusingkubectl:
kubectl apply -f https://docs.otterize.com/code-examples/kafka-mtls/all.yaml
Optional: check deployment status
Check that the client pods were deployed:
kubectl get pods -n otterize-tutorial-kafka-mtls
You should see:
NAME                                    READY   STATUS    RESTARTS   AGE
client-65695dfc4c-jf4hd                 1/1     Running   0          92s
client-other-7c4b8cbd8d-dpkt6           1/1     Running   0          92s
Let's monitor, in separate terminal windows, both clients' attempts to call Kafka, so we can see the effects of our changes in real time.
- Open a new terminal window [client] and tail the client log:
kubectl logs -f --tail 1 -n otterize-tutorial-kafka-mtls deploy/client
This client should be able to access both topics:
[client] Loading mTLS certificates
[client] Connecting to Kafka
[client] Creating a producer and a consumer for - mytopic
[client] Sending Messages
[debug]  [client] Sent message 1 [mytopic]
[client] Creating a producer and a consumer for - transactions
[client] Sending messages
[debug]  [client] Sent message 1 [transactions]
[client] Sent message to topic: transactions - [client] Sent message 1 [transactions]
[client] Sent message to topic: mytopic - [client] Sent message 1 [mytopic]
[client] Read message from topic: mytopic - [client-other] Sent message 27 [mytopic]
[client] Read message from topic: mytopic - [client-other] Sent message 18 [mytopic]
[client] Read message from topic: mytopic - [client] Sent message 2 [mytopic]
[client] Read message from topic: mytopic - [client-other] Sent message 36 [mytopic]
[client] Read message from topic: mytopic - [client-other] Sent message 6 [mytopic]
[client] Read message from topic: mytopic - [client-other] Sent message 33 [mytopic]
[client] Read message from topic: mytopic - [client-other] Sent message 19 [mytopic]
As you can see, both client and client-other are currently able to access both mytopic and transactions topics. (We see client sending messages and reading messages sent by client-other so we know both are able to access both topics.)
- Open another terminal window [client-other] and tail the client-other log:
This other client should also be able to access both topics:
kubectl logs -f --tail 1 -n otterize-tutorial-kafka-mtls deploy/client-other
This client should be able to access both topics:
[client-other] Loading mTLS certificates
[client-other] Connecting to Kafka
[client-other] Creating a producer and a consumer for - mytopic
[client-other] Sending messages
[client-other] Creating a producer and a consumer for - transactions
[client-other] Sending messages
[debug]  [client-other] Sent message 1 [mytopic]
[debug]  [client-other] Sent message 1 [transactions]
[client-other] Sent message to topic: transactions - [client-other] Sent message 1 [transactions]
[client-other] Sent message to topic: mytopic - [client-other] Sent message 1 [mytopic]
[client-other] Read message from topic: transactions - [client] Sent message 5 [transactions]
You can now browse to your account at https://app.otterize.com and see the access graph for your cluster:
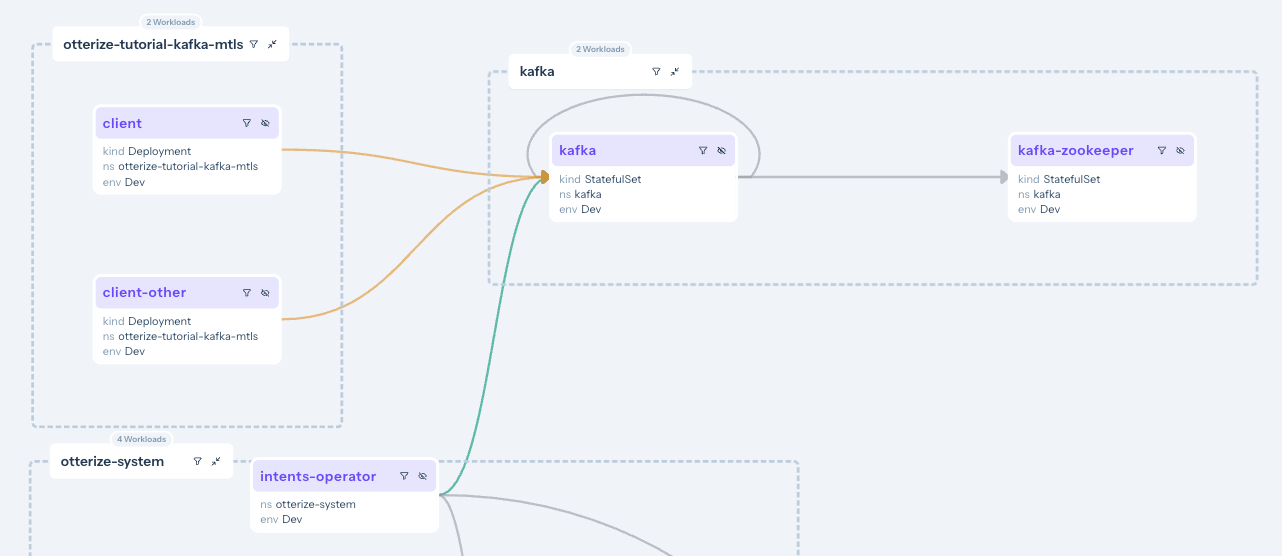
The access graph shows, through its green and orange lines linking the workloads, that no clients are currently blocked because we haven't enabled any sort of enforcement yet. The orange lines indicate that, since we have not declared any intents for these clients, they would be blocked if we were to turn enforcement on.
Apply intents
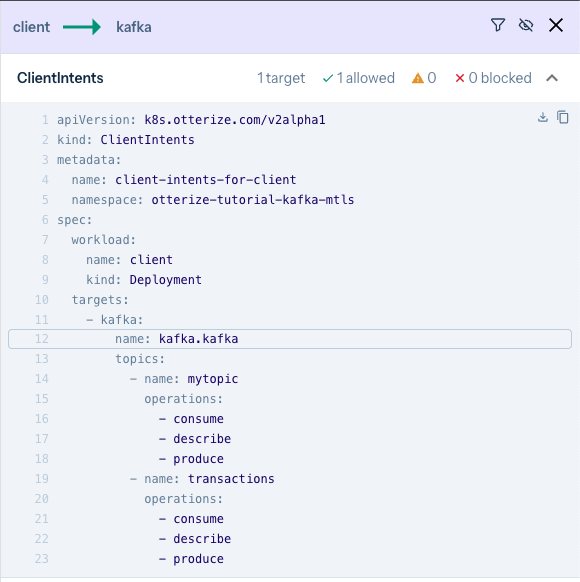
You can click on the workloads or the lines connecting them to see which ClientIntents you need to apply to make the connection go green!
- The client declares its intent to call the
kafka.kafkaserver with thisintents.yamlfile:
apiVersion: k8s.otterize.com/v2beta1
kind: ClientIntents
metadata:
  name: client
  namespace: otterize-tutorial-kafka-mtls
spec:
  workload:
    name: client
    kind: Deployment
  targets:
    - kafka:
        name: kafka.kafka
        topics:
          - name: mytopic
            operations: [ produce,describe,consume ]
          - name: transactions
            operations: [ produce,describe,consume ]
---
apiVersion: k8s.otterize.com/v2beta1
kind: ClientIntents
metadata:
  name: kafka
  namespace: kafka
spec:
  workload:
    name: kafka
    kind: StatefulSet
  targets:
    - kubernetes:
        name: kafka
        kind: StatefulSet
    - service:
        name: kafka-zookeeper
We can apply intents for the client by applying the client-intents.yaml file:
kubectl apply -f https://docs.otterize.com/code-examples/kafka-mtls/client-intents.yaml
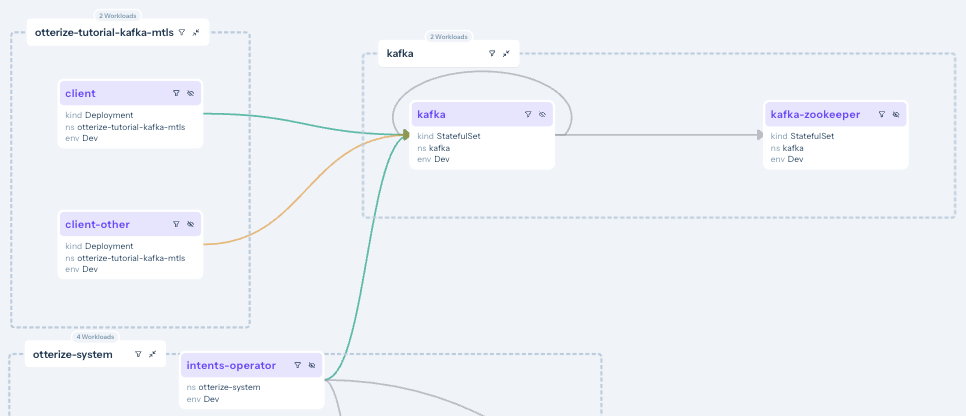
If you go back to your access graph, you'll now see that the client has a solid green line connecting it to the Kafka broker. This is because the client has both declared its intent to access the Kafka broker, and it has been authenticated using mTLS.
If you click on that solid line, you can see that the client has intents declared and allowed, so access is assured.
- At this point, since the Kafka server is not actually protected, the
client-othercan still access the topics. The line is orange, indicating that it has no declared intents.
We can see what happened:
- Kafka topic-specific intents from [client] are declared (solid green line).
- Calls from [client-other] are not declared (orange line).
- Looking at the line connecting [client] to Kafka workload, we can see that [client] has specific access configured (via Kafka ACLs) to perform
alloperations on themytopicandtransactionstopics.
Also, the access graph shows information about the mTLS certificates (credentials) distributed to the various workloads, as long as Cloud-managed credentials are being used.
Turn on protection
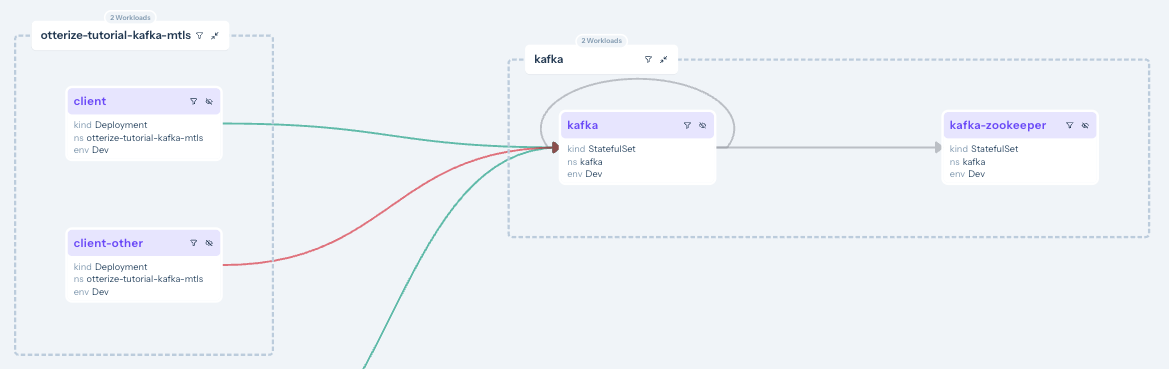
At this point, we haven't actually protected our Kafka broker. From everything we've done so far, we can see, however, that if we were to turn on protection, the client-other would lose access to the broker.
Let's see that in action. Our clients that have not declared intents will be blocked from accessing the broker.
We need to turn protection on in for this Kafka broker by declaring it as a protected service:
apiVersion: k8s.otterize.com/v2beta1
kind: ProtectedService
metadata:
  name: kafka-protectedservice
  namespace: kafka
spec:
  name: kafka
Apply this ProtectedService resource:
kubectl apply -f https://docs.otterize.com/code-examples/kafka-mtls-cert-manager/protectedservice.yaml
If you once again tail the logs for client-other you'll see that it is no longer authorized to access this topic:
[client-other] Loading mTLS certificates
[client-other] Connecting to Kafka
[client-other] Creating a producer and a consumer for - transactions
[client] Sending messages
[client-other] Creating a producer and a consumer for - transactions
[client] Sending messages
time="[...]" level=error msg="Failed reading/writing to Kafka"
error="kafka server: The client is not authorized to access this topic
And if you look back at your access graph, you'll see that client-other is blocked.
What did we accomplish?
Controlling Kafka access no longer means touching ACLs, issuing, managing and distributing certs, establishing trust, etc.
As we saw with pod-to-pod access, clients simply declare with their intents files the Kafka access they need, and define a place on their filesystem where they'll get the appropriate credentials (certs).
The next
kubectl applyyou'll run will ensures that all the appropriate certs are issued and distributed, and that Kafka ACLs are configured to reflect precisely the intended topic-level access.
Expand to see what happened behind the scenes
One-time setups
We configured the Helm chart for Kafka to:
- Allow the Otterize intents operator to be a Kafka super user (authenticated with a certificate).
- Use the SSL protocol for the Kafka listeners.
- Let Otterize know it should generate mTLS credentials in the Java Key Store and Java Trust Store formats, and store them as a Kubernetes secret.
- Use mTLS to authenticate clients, using this Kubernetes secret.
We configured Kafka itself to:
- Add the TLS certificates of the Otterize credentials operator.
- Set the default ACL for all topics to allow anonymous access.
Per-client setups
We configured each of our clients to:
- Let Otterize know it should generate mTLS credentials for that client.
- Mount the Kubernetes secret in a local volume.
This already enables mTLS authentication between both clients and Kafka.
Then we applied intents:
- We only declared that the client pod (not the client-other pod) needed to access the
mytopictopic.
This allowed the client pod its access and protected mytopic from any unintended access, such as from client-other.
Teardown
Take care to remove the intents before removing the KafkaServerConfig or the Kafka broker, as the operator will not know how to remove the intents if you first make it forget about the Kafka broker or it can't access the broker. If it's unable to remove the ACLs for the intents, the operator will prevent the intents from being deleted until it is able to do so.
To remove the deployed examples run:
# run this first:
kubectl delete -f https://docs.otterize.com/code-examples/kafka-mtls/client-intents.yaml
# then the rest:
kubectl delete -f https://docs.otterize.com/code-examples/kafka-mtls/all.yaml
kubectl delete -f https://docs.otterize.com/code-examples/kafka-mtls/kafkaserverconfig.yaml
helm uninstall kafka -n kafka