NetworkPolicy Automation
Otterize automates pod-to-pod access control with network policies, within your cluster.
Instead of managing pod identities, labeling clients, servers and namespaces, and manually authoring individual network policies, Otterize implements intent-based access control (IBAC). You just declare what calls the client pods intend to make, and everything is automatically wired together so only intended calls are allowed.
In this tutorial, we will:
- Deploy a server pod, and two client pods calling it.
- Declare that the first client intends to call the server.
- See that a network policy was autogenerated to allow just that, and block the (undeclared) calls from the other client.
Prerequisites
Install Otterize on your cluster
To deploy Otterize, head over to Otterize Cloud and create a Kubernetes integration on the Integrations page, and follow the instructions. Make sure to enable enforcement mode for this tutorial. If you already have a Kubernetes cluster connected, skip this step.
Tutorial
Deploy the server and the two clients
Our simple example consists of three pods: an HTTP server and two clients that call it.
Expand to see the example YAML files
- namespace.yaml
- server.yaml
- client.yaml
- client-other.yaml
apiVersion: v1
kind: Namespace
metadata:
  name: otterize-tutorial-npol
apiVersion: apps/v1
kind: Deployment
metadata:
  name: server
  namespace:  otterize-tutorial-npol
spec:
  selector:
    matchLabels:
      app: server
  template:
    metadata:
      labels:
        app: server
    spec:
      containers:
        - name: server
          image: node:19
          command: [ "/bin/sh","-c" ]
          args: [ "echo \"Hi, I am the server, you called, may I help you?\" > index.html; npx --yes http-server -p 80 " ]
---
apiVersion: v1
kind: Service
metadata:
  name: server
  namespace:  otterize-tutorial-npol
spec:
  selector:
    app: server
  ports:
    - protocol: TCP
      port: 80
      targetPort: 80
apiVersion: apps/v1
kind: Deployment
metadata:
  name: client
  namespace:  otterize-tutorial-npol
spec:
  selector:
    matchLabels:
      app: client
  template:
    metadata:
      labels:
        app: client
    spec:
      containers:
        - name: client
          image: alpine/curl
          command: [ "/bin/sh", "-c", "--" ]
          args: [ "while true; do echo \"Calling server...\"; if ! timeout 2 curl -si server 2>/dev/null; then echo \"curl timed out\"; fi; sleep 2; done" ]
apiVersion: apps/v1
kind: Deployment
metadata:
  name: client-other
  namespace:  otterize-tutorial-npol
spec:
  selector:
    matchLabels:
      app: client-other
  template:
    metadata:
      labels:
        app: client-other
    spec:
      containers:
        - name: client-other
          image: alpine/curl
          command: [ "/bin/sh", "-c", "--" ]
          args: [ "while true; do echo \"Calling server...\"; if ! timeout 2 curl -si server 2>/dev/null; then echo \"curl timed out\"; fi; sleep 2; done" ]
- Deploy the two clients and the server in their namespace using
kubectl:
kubectl apply -f https://docs.otterize.com/code-examples/automate-network-policies/all.yaml
Optional: check deployment status
kubectl get pods -n otterize-tutorial-npol
You should see
NAME                           READY   STATUS    RESTARTS   AGE
client-596bcb48d5-pnjxc        1/1     Running   0          8s
client-other-f56d65d7f-z2wg2   1/1     Running   0          8s
server-6bb4784ccc-wtz7f        1/1     Running   0          8s
Let's monitor both client attempts to call the server with additional terminal windows, so we can see the effects of our changes in real time.
- Open a new terminal window [client] and tail the client log:
kubectl logs -f --tail 1 -n otterize-tutorial-npol deploy/client
Expected output
At this point the client should be able to communicate with the server:
Calling server...
HTTP/1.1 200 OK
...
Hi, I am the server, you called, may I help you?
- Open another terminal window [client-other] and tail the client-other log:
kubectl logs -f --tail 1 -n otterize-tutorial-npol deploy/client-other
Expected output
At this point the client should be able to communicate with the server:
Calling server...
HTTP/1.1 200 OK
...
Hi, I am the server, you called, may I help you?
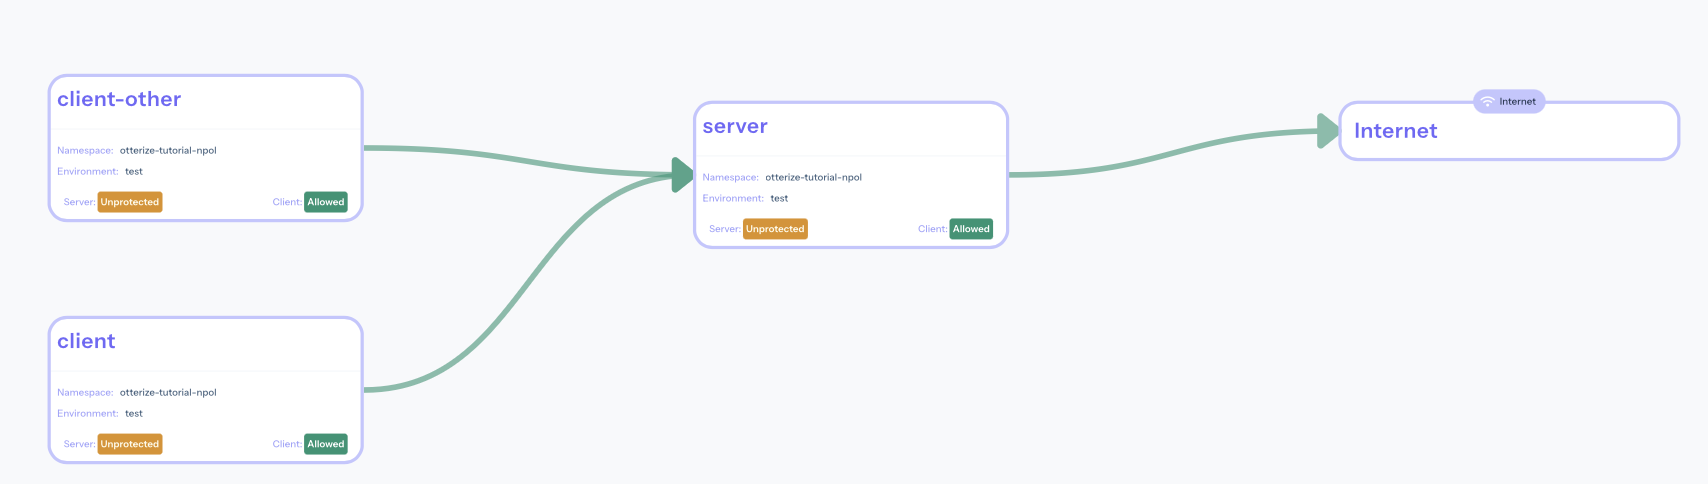
If you've attached Otterize OSS to Otterize Cloud, you can now browse to your account at https://app.otterize.com and see the access graph for your cluster:
Apply intents
We will now declare that the client intends to call the server.
When the intents YAML is applied, creating a custom resource of type ClientIntents,
Otterize will add a network policy to allow the intended calls
(client → server) and fail all unintended calls (e.g., client-other → server).
You can click on the workloads or the lines connecting them to see which ClientIntents you need to apply to make the connection go green!
- Here is the
intents.yamldeclaration of the client, which we will apply below:
apiVersion: k8s.otterize.com/v2beta1
kind: ClientIntents
metadata:
  name: client
  namespace:  otterize-tutorial-npol
spec:
  workload:
    name: client
  targets:
    - service:
        name: server
See it in action
Keep an eye on the logs being tailed in the [client-other] terminal window,
and apply this intents.yaml file in your main terminal window using:
kubectl apply -f https://docs.otterize.com/code-examples/automate-network-policies/intents.yaml
Client intents are the cornerstone of intent-based access control (IBAC).
as expected since it didn't declare its intents:
Calling server...
HTTP/1.1 200 OK
...
Hi, I am the server, you called, may I help you?  # <- before applying the intents file
Calling server...                                 # <- after applying the intents file
curl timed out
Calling server...
curl timed out
Not seeing the time out?
If client-other isn't timing out, then the installed CNI plugin likely does not support network policies. Consult the docs for your Kubernetes distribution or head back to the Calico installation section to install one. For example, Minikube does not start by default with a CNI that supports network policies but you can ask it to start with one that does, such as Calico.
- And in the [client] terminal you should see that calls go through, as expected since they were declared:
Calling server...
HTTP/1.1 200 OK
...
Hi, I am the server, you called, may I help you?
- You should also see that a new network policy was created:
kubectl get NetworkPolicies -n otterize-tutorial-npol
This should return:
NAME                                           POD-SELECTOR                                         AGE
access-to-server-from-otterize-tutorial-npol   otterize/server=server-otterize-tutorial-np-7e16db   6s
If you've attached Otterize OSS to Otterize Cloud, go back to see the access graph in your browser:
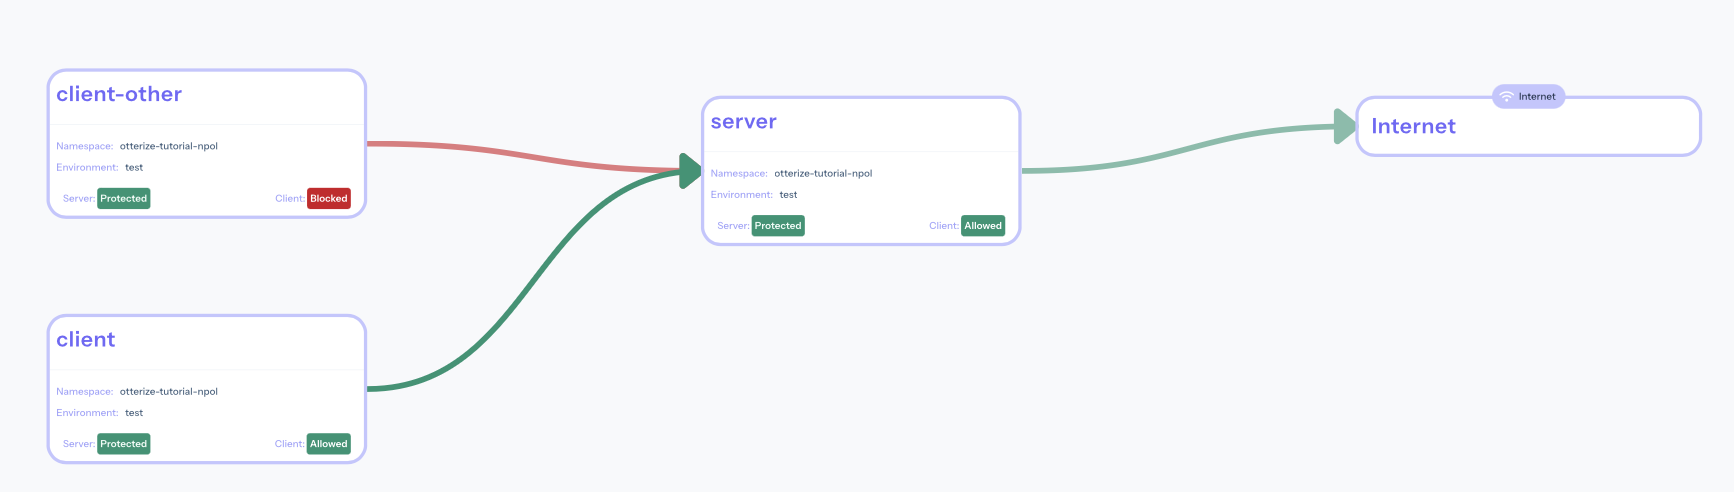
It's now clear what happened:
- The server is now protected, and is also blocking some of its clients. Click on it to see what to do about it.
- Calls from [client] are declared and therefore allowed (green line).
- Calls from [client-other] are not declared and therefore blocked (red line). Click on the line to see what to do about it.
Otterize did its job of both protecting the server and allowing intended access.
What did we accomplish?
Controlling access through network policies no longer means touching network policies at all.
Clients simply declare what they need to access with their intents files.
The next
kubectl applyensures that network policies automatically reflect the intended pod-to-pod access.
Expand to see what happened behind the scenes
Otterize generated a specific network policy on the ingress of the pods of a server, allowing the server to be accessed by the pods of a client. Otterize uses labels to define the network policy and associate it with a server in a namespace and a client in a namespace, as follows:
- The server's pods are given a label
intents.otterize.com/serverwhose value uniquely represents that server. The network policy stipulates that it applies to the ingress of server pods with this label. - The client's pods are given a label
intents.otterize.com/access-...derived from the server's uniqueintents.otterize.com/servervalue. The network policy stipulates that only client pods with this matching label can access the server. - The client's namespace is given a label
intents.otterize.com/namespace-namewhose value is the namespace of the client. The network policy stipulates that only client pods whose namespaces have this label can access the server. This is used to allow cross-namespace intents.
Otterize saved us from doing all this work by simply declaring the client's intents in intents.yaml,
while the appropriate network policies were managed automatically behind the scenes.
Further information about network policies and Otterize can be found here.
Try to create an intents file yourself for client-other, and apply it to allow this other client to call the server.
What's next
- Get started with the Otterize network mapper to help you bootstrap intents files for use in intent-based access control (IBAC).
Teardown
To remove the deployed examples run:
kubectl delete namespace otterize-tutorial-npol