Mapping a Kubernetes network
The network mapper allows you to map pod-to-pod traffic within your K8s cluster.
In this tutorial, we will:
- Deploy a server, and two clients calling it.
- Map their communication using the network mapper.
Prerequisites
Install Otterize on your cluster
To deploy Otterize, head over to Otterize Cloud and create a Kubernetes cluster on the Integrations page, and follow the instructions.
We will also need the Otterize CLI.
Tutorial
Deploy demo to simulate traffic
Let's add workloads and traffic to the cluster and see how the network mapper builds the map.
Deploy the following simple example — client, client2 and server, communicating over HTTP:
kubectl apply -n otterize-tutorial-mapper -f https://docs.otterize.com/code-examples/network-mapper/all.yaml
Map the cluster
The network mapper starts to sniff traffic and build an in-memory network map as soon as it's installed. The Otterize CLI allows you to interact with the network mapper to grab a snapshot of current mapped traffic, reset its state and more.
For a complete list of the CLI capabilities read the CLI command reference.
Extract and see the network map
You can get the network map by calling the CLI visualize, list or export commands.
The visualize output format can be PNG or SVG. The export output format can be yaml (Kubernetes client intents files) and json.
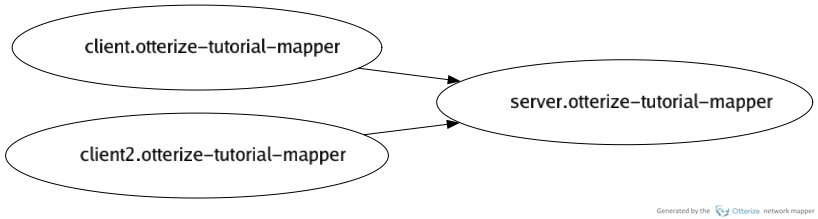
The following shows the CLI output filtered for the namespace (otterize-tutorial-mapper)
of the example above.
- Image
- List
- Export as intents
- Export as JSON
Visualize the pod-to-pod network map built up ("sniffed") so far, as an image:
otterize network-mapper visualize -n otterize-tutorial-mapper -o otterize-tutorial-map.pngFor the simple example above, you should get an image file that looks like:
List the pod-to-pod network map built up ("sniffed") so far:
otterize network-mapper list -n otterize-tutorial-mapperFor the simple example above, you should see:
client in namespace otterize-tutorial-mapper calls:
  - server
client2 in namespace otterize-tutorial-mapper calls:
  - server
Export as YAML client intents (the default format) the pod-to-pod network map built up so far:
otterize network-mapper export -n otterize-tutorial-mapperFor the simple example above, you should see (concatenated into one YAML file):
apiVersion: k8s.otterize.com/v2beta1
kind: ClientIntents
metadata:
  name: client
  namespace: otterize-tutorial-mapper
spec:
  workload:
    name: client
    kind: Deployment
  targets:
    - service:
        name: server
---
apiVersion: k8s.otterize.com/v2beta1
kind: ClientIntents
metadata:
  name: server
  namespace: otterize-tutorial-mapper
spec:
  workload:
    name: client2
    kind: Deployment
  targets:
    - service:
        name: server
Export as JSON the pod-to-pod network map built up so far:
otterize network-mapper export -n otterize-tutorial-mapper --format jsonFor the simple example above, you should see:
[
  {
    "kind": "ClientIntents",
    "apiVersion": "k8s.otterize.com/v2beta1",
    "metadata": {
      "name": "client",
      "namespace": "otterize-tutorial-mapper"
    },
    "spec": {
      "workload": {
        "name": "client"
        "kind": "Deployment"
      },
      "targets": [
        {
          "service": {
            "name": "server"
          }
        }
      ]
    }
  },
  {
    "kind": "ClientIntents",
    "apiVersion": "k8s.otterize.com/v2beta1",
    "metadata": {
      "name": "client",
      "namespace": "otterize-tutorial-mapper"
    },
    "spec": {
      "workload": {
        "name": "client"
        "kind": "Deployment"
      },
      "targets": [
        {
          "service": {
            "name": "server"
          }
        }
      ]
    }
  }
]
Show the access graph in Otterize Cloud
If you've attached Otterize OSS to Otterize Cloud, you can now also see the access graph in your browser:
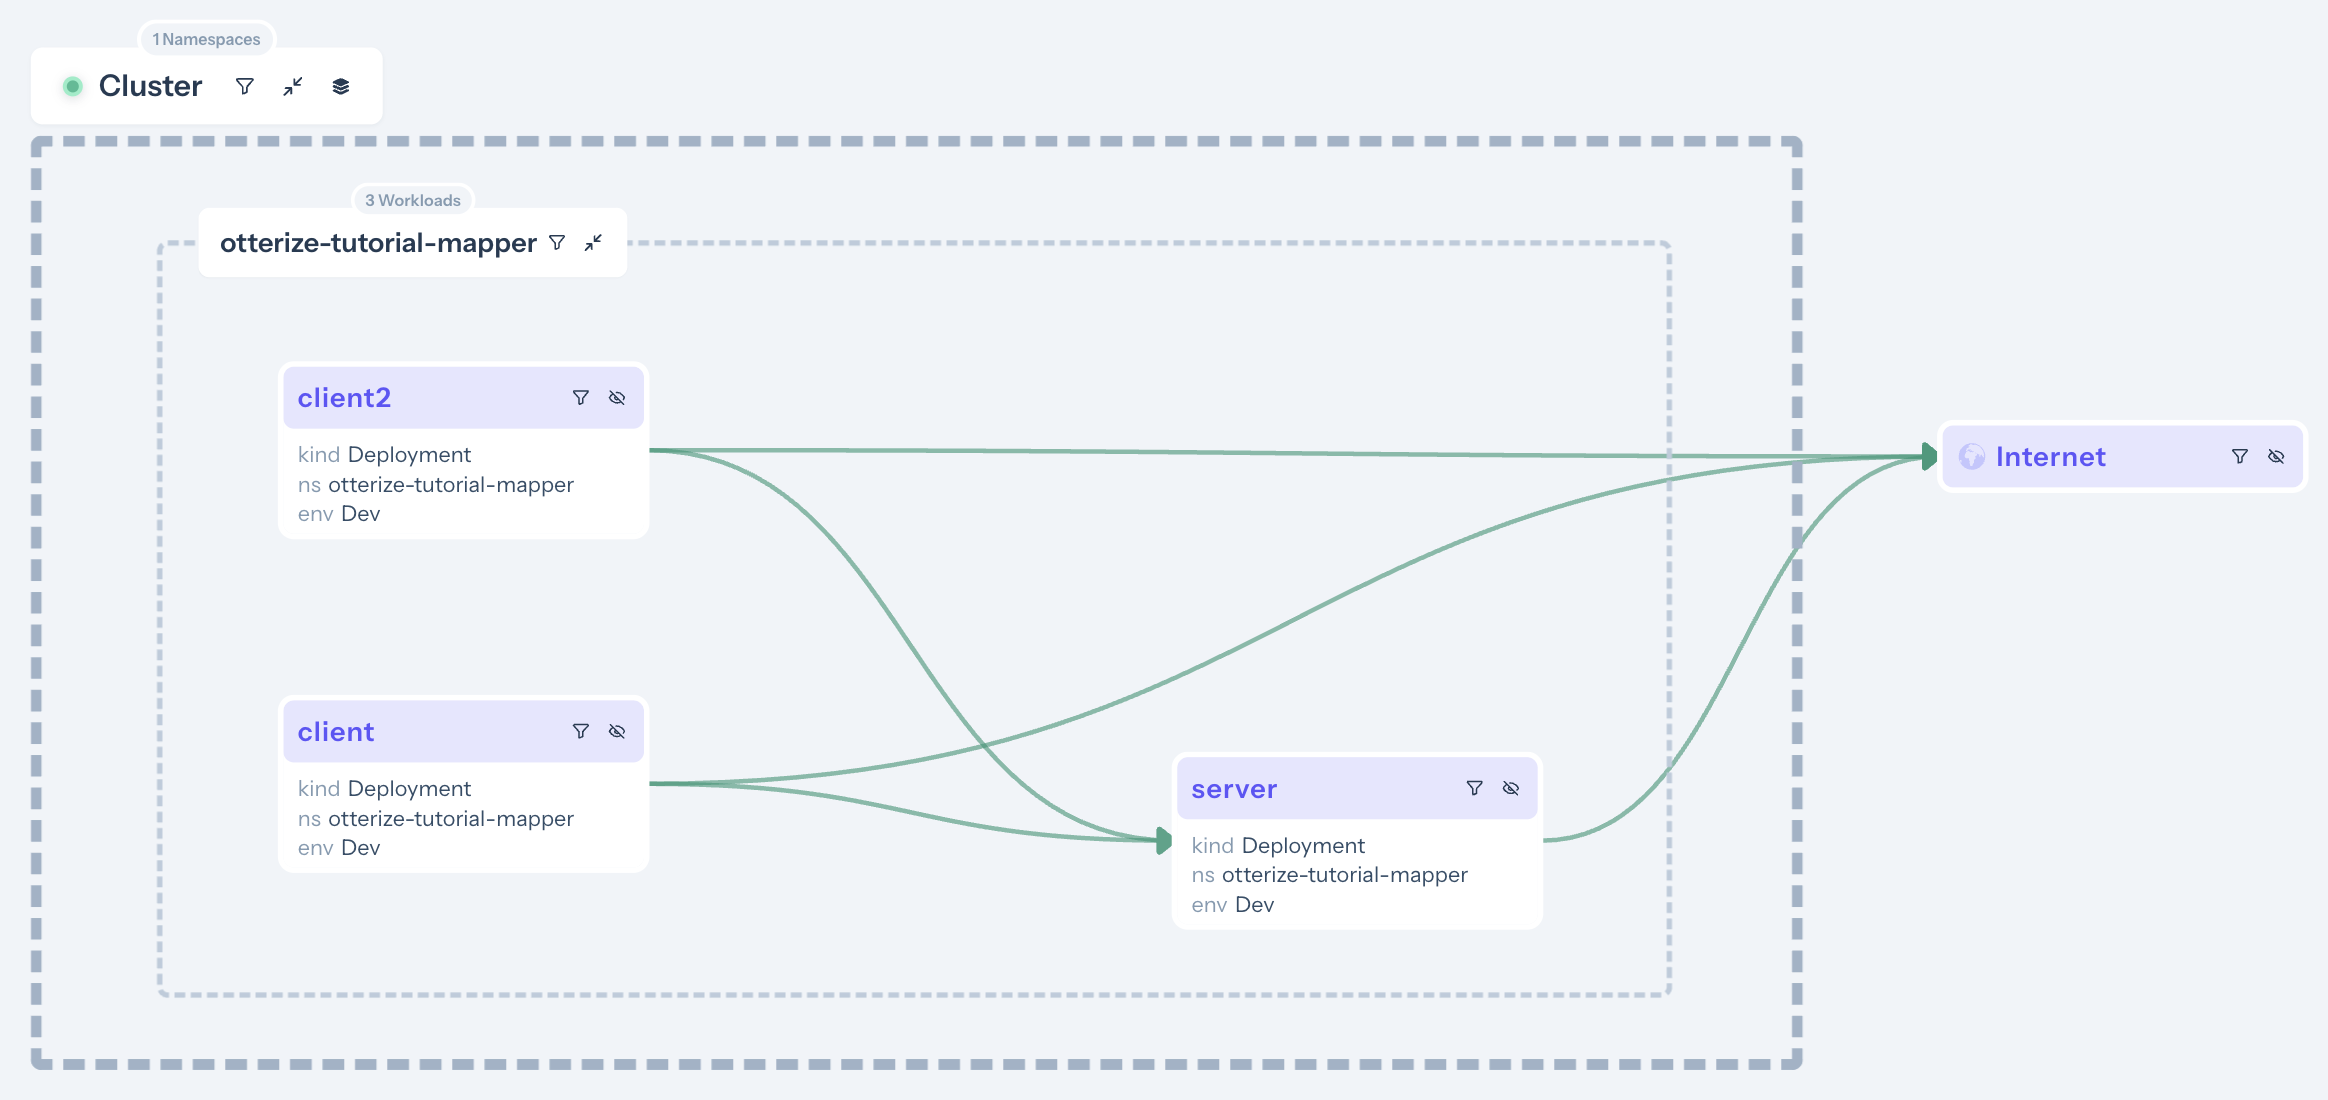
The access graph reveals several types of information and insights, such as:
- Seeing the network map for different clusters, seeing the subset of the map for a given namespace, or even — according to how you've mapped namespaces to environments — seeing the subset of the map for a specific environment.
- Filtering the map to include recently-seen traffic, since some date in the past. That way you can eliminate calls that are no longer relevant, without having to reset the network mapper and start building a new map.
- If the intents operator is also connected, the access graph now reveals more specifics about access: understand which workloads are protected or would be protected, and which client calls are being blocked or would be blocked. We'll see more of that in the next couple of tutorials
Note, for example, that the client → server arrow is green. Clicking on it shows additional information about the status of this connection. For example, that the connection is not explicitly allowed and would be blocked once any other clients will apply intents:

What's next
The network mapper is a great way to bootstrap IBAC. It generates client intents files that reflect the current topology of your workloads; those can then be used by each client team to grant them easy and secure access to the services they need, and as their needs evolve, they need only evolve the intents files. We'll see more of that below.
Where to go next?
- If you haven't already, see the automate network policies tutorial.
- Or go to the next tutorial to automate secure access for Kafka.
Teardown
To remove the deployed examples run:
kubectl delete namespace otterize-tutorial-mapper